Rib Cage Wort Chiller
Here is a system that will quickly chill wort, plus make hot and warm water for post-brew cleanup, saving time and hassle on brew days.
Many immersion chillers have their coils stacked directly on top of each other. The resulting metal-to-metal contact does not help transferring heat from the wort to the coils. This interleaved dual-coil design separates the coils, so each coil has maximum contact area with the hot wort.
The two coils are made of 3⁄8-inch soft copper pipe. The inlets and outlets are joined and connected to 1⁄2-inch copper pipe. The larger inlet and outlet pipes are needed because they carry the combined flow of both coils.

Due to the fact that the volume of water a certain pipe can move is measured by squaring the radius of the pipe, we can easily calculate that 1⁄2-inch pipe will be able to move almost twice as much water as each individual 3⁄8-inch pipes.

Copper is the ideal material for the chiller. It has excellent heat transfer properties and is easy to cut and solder. I suggest that you shop for copper at plumbing supply vendors. Their prices can be up to 50% less than most home improvement centers.
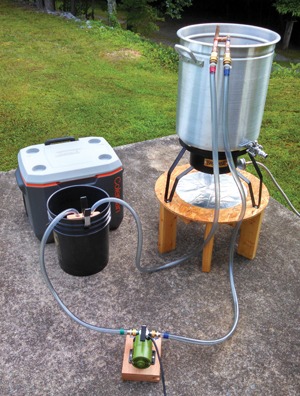
This rib-cage immersion chiller design can chill a 5-gallon (19-L) batch in 10-15 minutes. Initial chilling is done by recirculating from a 5-gallon (19-L) bucket of tap water. After several minutes, I will switch to recirculating ice water from an insulated cooler, which quickly brings wort to pitching temperature. The resulting hot and warm water is saved for use during post-brew cleanup.
An inexpensive water transfer pump is used to recirculate the water. The Drummond 1⁄10 horsepower model is available for about $55 (USD). It comes standard with water hose connections. Using the cooling power of ice eliminates any limitations associated with ground water temperature. Since the system is self-contained, you are not limited to brewing near a cooling water supply.
To use the system, fill a 5-gallon (19-L) bucket with tap water, and an insulated cooler with 5 gallons (19 L) of water and about 20 lbs. (9 kg) of ice. Shop around for ice because prices vary greatly. I get 20 lbs. (9 kg) of crushed ice for a little more than $2. Worth every penny! Heat transfer from ice is dependent on surface area, so the greater surface area of small cubes or crushed ice will give the best results.
Cleanup time for this system is negligible, since water (not wort) is being pumped. The immersion chiller can be dunked and washed off in the insulated cooler (which will be full of warm water after use). There is no need to clean the pump or hoses because they are only exposed to clean water. There are no worries of residue building up inside the pump, hoses, or chiller (as is a problem with plate chillers, for example), because you are moving water, not wort. The pump and hoses are easily stored inside a 5-gallon (19-L) bucket.
Materials & Tools
Drummond 1⁄10-HP pump #63317
50 ft. (15.2 m) 3⁄8-inch O.D. soft copper pipe
4 ft. (1.2 m) 1⁄2-inch I.D. hard copper pipe
(4) 1⁄2-inch copper T joint
(2) ½-inch x 1⁄2-inch copper 90 degree elbow
(2) 1⁄2-inch x 1⁄2-inch copper 45 degree elbow
(4) 1⁄2-inch x 3⁄8-inch copper reducing coupling
(4) 3⁄8-inch x 1⁄4-inch copper reducing coupling
(2) 1⁄2-inch copper male threaded fitting
(2) Threaded hose adapter
6-inch (15-cm) spring clamp
Solder, soldering flux, Teflon tape
Step by Step
1. MAKE THE SOFT COPPER COILS
The two 25-ft. (7.6-m) coils are made from 50 ft. (15.2 m) of 3⁄8-inch soft copper refrigeration pipe. The pipe will come in a coil, leave it that way! Don’t uncoil or straighten it. Locate the middle of the coil and cut it into two coils of equal length. Get close, but don’t stress about finding the exact middle, the ends will need to be trimmed later.
Determine what coil diameter will work best in your kettle(s). Find a form for coiling, a paint can, a corny keg, or a small plastic bucket; that is close to the diameter you need. Wrap the copper pipe tightly around the form. Do this without unrolling the coil, all you are doing is adjusting the diameter of the existing coil.
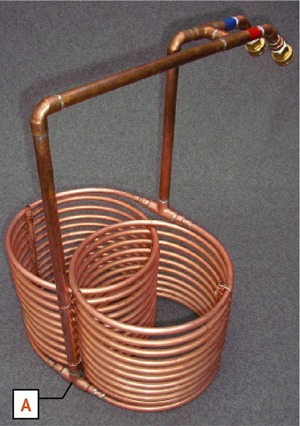
Interleave the two coils by sliding them together in alternating layers. This is easy to do. Orient the bottom ends of the pipe as shown in the photo, and slide on the reducing couplings and T fitting [A] that join them. Don’t solder yet! You’ll want to dry fit everything together before any joints are soldered.
Make sure the total width will fit inside your kettle.

2. CUT THE RISERS & HORIZONTALS
At the top of the coils, straighten the ends of the pipes, and trim them so they can be joined with reducing couplings and a T fitting. [B]
Place the coil assembly in your kettle. Cut two riser pipes [C] from the 1⁄2-inch hard copper. They should go to the top of the kettle rim. Slip 90 degree elbows onto the top of the riser pipes, then cut straight pipes that extend horizontally over the edge of the kettle.

3. PREPARE THE HOSE CONNECTION AREA
The two T joints [D] near the hose connections are for structural bracing only, the horizontal pipes go straight through them. Use a round metal file or a sanding drum on a Dremel tool to ream out the inside of the two T fittings. Cut a short cross piece of ½-inch pipe to join the two T’s [E].
Slip 45 degree elbows [F] onto the horizontal pipes, then cut short pieces of pipe for joining the threaded adapters for the hose connectors.
4. SOLDER, THEN REINFORCE
Clean and prep all joints, apply soldering flux, then solder. Where the coils intersect, reinforce the intersection structurally by wrapping with small gauge solid copper wire. Also wire the coils to the riser tubes. Straight pieces of copper pipe and some wire can be used to brace the outer coils [G].

5. MAKE A HOSE CLAMP
Use a spring clamp and a block of wood to make a clamp that will secure the hose ends to the water containers [H]. Hoses can be made from clear 5⁄8-inch I.D. vinyl tubing and water hose fittings.
6. CUT THE RISERS & HORIZONTALS
Before using the chiller the first time, clean the outside of the copper with citrus cleaner and hot water. To sanitize the chiller, put it in the kettle for the last 10-15 minutes of the wort boil.
To chill wort, first pump from a bucket of tap water. When the temperature of the water in the bucket is roughly equal to the wort temperature, it has no more cooling capacity. Switch to pumping ice water to bring the wort down to pitching temperature.