For those of you who have caught the oak-barrel love (or just about any barrel type for that matter), you know that once in . . . you’re hooked.
There really is nothing that compares to inviting a small group of friends over and pulling samples from the barrel for a tasting. Does it need more time? Should I chop up a vanilla bean and toss it in? Are the Bourbon flavors melding? The complexities found from wood-aging beer, thanks especially from the microoxidation that occurs through the staves, can be a thing of beauty when handled with finesse.
I love brewing darker beers like browns, porters, and stouts for aging in more freshly purchased Bourbon barrels. I keep two 10-gallon (38-L) barrels in my house, one for the funk-da-fied beers (the older barrel) and one for clean beers (the newer barrel).
This means I’ve been hoisting roughly 125–130 lbs. (57–59 kg) from awkward positions many times a year. That needed to change.
But the reality of my house is that it doesn’t have unlimited space and enough of it is already taken up by my bar and draft system, grain storage, and brewing equipment (not to mention maybe 1⁄3 of my garage). This means I don’t have a dedicated place for my barrels, so I have to shuffle barrels around my basement to get to things located behind the barrels fairly regularly. Also, I keep the barrels in separate locations in my basement to prevent cross-contamination from wild organisms in the funky barrel. This means one barrel needs to be moved through two rooms when it is filled or when needing to be racked. Long story short . . . moving my barrels is a fairly regular occurrence. Add in the fact that I don’t have a peristaltic pump for racking, which means I need to lift my barrels up on top of a stable chair to get gravity to work for me, and it just seemed like I was asking to throw my back out. After years of muscling my full barrels through this system, I knew I had to come up with a better solution.
Doing some quick math, 10 gallons (38 L) of water clocks in at 83.4 lbs. (38 kg). If it’s an imperial stout with a terminal gravity that clocks in at 1.034, that’s an additional 2.8 lbs. (1.3 kg) of sugar at that volume of beer. I don’t have my exact weight of my empty barrels, but that size barrel typically runs in the 40–45 lb. (18–20 kg) range according to an online search. This means I’ve been hoisting roughly 125–130 lbs. (57–59 kg) from awkward positions many times a year. That needed to change.
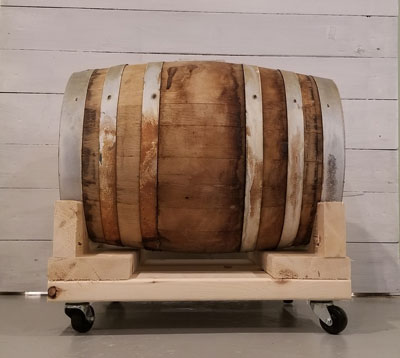
So my solution was a two part design: A mobile cradle for each barrel that rides on caster wheels and a hoist system for lifting the barrels for racking. While my hoist system is just one way to skin this cat, any secure hoist system would work. I almost splurged on an electric lift, but figured that might be more headache than it was worth. A basic power puller (or come-along) ratchet hung from the ceiling provided the perfect hoist and can be removed and used for a plethora of other tasks around the house and yard.
The cradles have been very handy. I can easily pull my barrels out of their nook for racking, topping off, or like last night, when my wife needed me to pull the winter clothes from the far back corner of the laundry room. If you are dealing with moving barrels, I highly recommend this project.
Tools and Materials
(1) 2-in. x 6-in. x 8-ft.
spruce board
(4) 90-lb. (40-kg) caster wheels
Hoist system (I used a Maasdam 1-ton Pow’r puller)
Large diameter screw eye
Chop saw
Tape measure
Wood screws
Step by Step
1. Barrel measurements
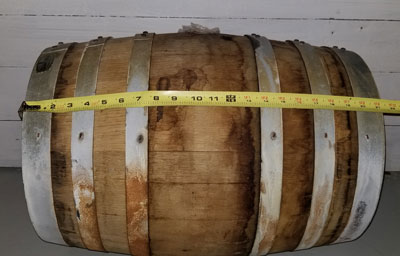
I solely work with 10-gallon (38-L) barrels, so if you want to design your own, you may need to adjust the board length and reinforcements in order to fit and support your barrel size and weight, bigger or smaller. I cut the beams to the length of the barrel, then the supports to 2 in. (5 cm) longer on each side than the barrel’s maximum girth.
2. Create the base
I placed the beams on the bottom and the supports on top and secured them together with several 2.5-in. (6.4 cm) wood screws. I then secured the caster wheels on the bottom. I used two free-rolling casters and two locking casters; this allows me to secure the cradle in place when I don’t want them to move.
3. Cut the wedge pieces
With the remaining 2×6, I first cut it in half, then gave each half a 45° mitre cut creating 4 wedges. With the help of my wife, I centered the barrel on the base and I eyeballed where to cut each of the wedges. I decided to chop the boards down to 2×4 size, so if you have some 2×4 board handy, you may consider using this size instead for the wedges. I used two 3-in. (7.6 cm) screws to secure each wedge to the base. I performed steps 2 and 3 twice, one cradle for each barrel.
4. Secure Your Anchor
Next up was to create my hoist. While I was almost tempted to purchase an electric hoist, the reality was that a come-along ratchet device would be much more handy around the house. So I pre-drilled a hole into a secure joist in the basement ceiling and placed a large-diameter eye screw in the hole. The come-along ratchet can then be returned to my garage when not in use.
5. Create Your Hoist Cradle
This step is one that I will be improving in the future with a better hoist cradle for the barrels, but for now simply winding the strap from the ratchet three times around the barrel to create a sling-like seat for the barrel has done the trick. But something like a wide-lifting nylon sling would probably be preferential.
6. Test
This one is a rather easy step but one that I perform with each barrel lift to make sure that the lift cradle is properly secure. With the two caster wheels locked, I lift the barrel just about an inch (2.5 cm) off the base and let it hang for a minute. Once I feel comfortable that the barrel is properly secured, I can then complete the lift up to the chair where I rack the beer into kegs.
A homebrewer decided to step up to a plate chiller for his all-in-one brew system to reduce both the chilling time and his water consumption
This website uses cookies to improve your experience. You can opt-out if you wish.AcceptRejectRead More
Privacy & Cookies Policy
Privacy Overview
This website uses cookies to improve your experience while you navigate through the website. Out of these, the cookies that are categorized as necessary are stored on your browser as they are essential for the working of basic functionalities of the website. We also use third-party cookies that help us analyze and understand how you use this website. These cookies will be stored in your browser only with your consent. You also have the option to opt-out of these cookies. But opting out of some of these cookies may affect your browsing experience.
Necessary cookies are absolutely essential for the website to function properly. This category only includes cookies that ensures basic functionalities and security features of the website. These cookies do not store any personal information.
Any cookies that may not be particularly necessary for the website to function and is used specifically to collect user personal data via analytics, ads, other embedded contents are termed as non-necessary cookies. It is mandatory to procure user consent prior to running these cookies on your website.