Wine Barrel Table: Give an old barrel a new life
I recently came across a used half barrel that the local pub was throwing out. It was almost ready to fall to pieces as two of the bands had fallen off and the top one was also ready to fall off. It would be very difficult to reassemble, so I carefully put the bands back on and took it home. I knew there was a good use for it, but I wasn’t sure what that was at the time.
I knew I wanted to use the barrel for some sort of furniture project, but I was not sure what to make with it until I saw the nice graphics on the top. I sanded the top back and put furniture oil on it to make the art stand out. It looked good when I finished so I decided to keep the graphic, which would mean keeping the top intact. My first thought was to convert the barrel into a coffee table, but as the project progressed, the missus said she liked the height of the table and would like it on the deck next to her chair.
I decided to make the table with three legs as they don’t rock around on uneven surfaces, which would be best for outdoor furniture. If you have all of your materials ready to go, it should take only a few hours to build from start to finish, especially if you have help — I convinced my kids to help me with the sanding and staining.
The basic premise of the project is to mark out the legs and cut them out with a reciprocating hand saw. Once you have the legs cut out, you can remove the bottom ring, reinforce the top ring and do some sanding and staining. Aside from the task of acquiring the actual barrel, you don’t need too many tools or supplies (see list below), especially if you already like to construct woodworking projects at home.

As is the case with any woodworking project, always be safe. Be sure to use eye protection when sawing, grinding, sanding and hammering, and also build your barrel table in a well-ventilated area or outside where you won’t inhale fumes from any wood treatments or finish.
I enjoy building my own projects, many of which you can check out on the Web at Instructables.com (find my posts at www.instructables.com/member/liquidhandwash.) In addition to my wine barrel table project I also made a fruit bowl with some of the left over barrel planks. After making the table, I spent a long time sitting and thinking on a pile of the oak barrel planks, which were curved and tapered, making them difficult to work with. So the fruit bowl idea was a great way to use some of that leftover wood. You can make your own fruit bowls with most of the same tools you use for this table project along with some wood glue and a few wood clamps. A coat of furniture oil makes the wine stain on the inside of the
timber darker, which gives the bowl an unusual look. (In addition to my other build-it projects on Instructables, you can also see some great photos of my kids helping me out with building the projects.)
Materials & Tools
- a used 60-gallon (225-L) wine barrel
- sand paper grits 40, 80, 120, 240
- matte black paint (or your color of choice)
- 3 or 4 coach bolts with washers and nuts
- drill and drill bits
- 3 or 4 wood screws
- small nail or tacks
- hammer
- jig saw (reciprocating saw)
- clean rags
- your favorite timber finish
- angle grinder, with sanding disc
Steps

1. REMOVE BANDS
Start by removing the top two bands with a hammer and a block of wood and then clean them with thinners. I hung them from the roof with wire and spray painted them matte black, but you can spray them any color you like. I also painted the heads of the coach bolts.
Next, mark out the three slats that are going to be used for legs. Make sure the bands are straight and tight as well as drilled and screwed to the three slats to the bottom band so nothing will move in the next steps. The top band had quite a sharp edge on it, so I used a grinder with a sanding disc to remove the edge.

2. SANDING, OILING, DRILLING
Next you can give the barrel an initial sanding. I used four different grit sand papers starting with 40, then 80, 120 and 240. I only sanded the top and the top of the sides and the legs. You could probably do this step last, but I put a coat of my favorite furniture oil on so that it would be under the bands, helping protect the timber from spills and moisture. Just use a rag to rub the oil on. I only oiled the surfaces that were not going to be removed. Next drill three holes big enough for a jigsaw blade to pass through.

3. CUTTING THE LEGS
Next, cut around the bottom line the second band has left. I found the oak was very hard and difficult to cut with a dull blade, so be sure to have a new, sharp blade. (I should really have put a new blade in the saw, but the store was closed.) Don’t forget to leave the the legs uncut. The waste wood can then be removed and the second band can now be fitted. I knocked it down with a hammer and a block of wood and drilled three holes through the band and the legs into which the coach bolts were fitted.

4. SECURE THE TOP BAND
To help keep the top band in place, I drilled three small holes and nailed in some carpet tacks as they had an old style black head which matched the look of the table.

5. REMOVE THE BOTTOM HOOP
Now that the table has been bolted together, the bottom band can be removed and the legs sanded and finished off. The missus likes the height of the table so I left it at this height, but it could also be cut down for a coffee table or to whatever height you would prefer. The legs are then sanded before more oil is applied.

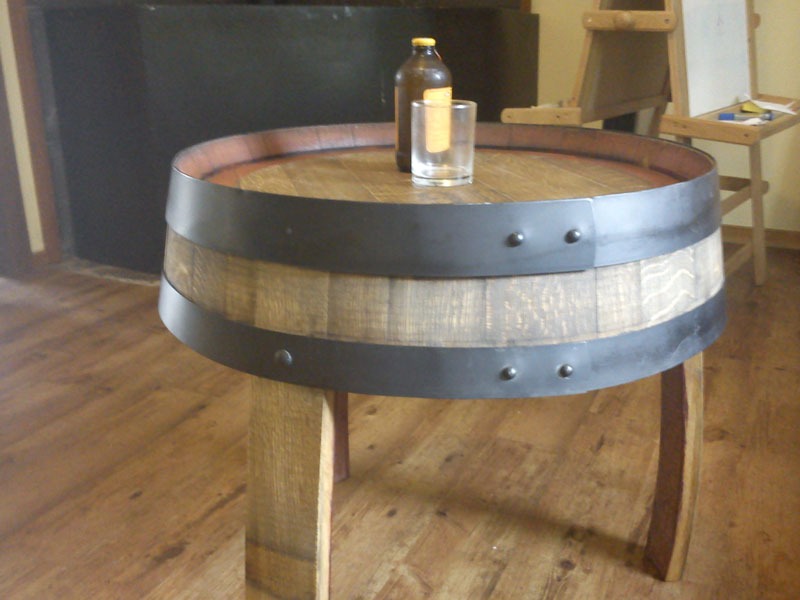
6. ENJOY YOUR TABLE
Finished! The table is sturdy (even though the curve of the staves may give the impression that it is not). This little table is great for serving drinks. You may reapply wood oil periodically if the wood looks dry after a few seasons.