Immersion Lid Temperature Controller
For the past few years I’ve been doing small batch brew-in-a-bag (BIAB); brewing 2.5 gallons (9.5 L) of delicious beer at a time, in my kitchen, by my lonesome. Something was missing in my homebrew life, and that was the social aspect of brewing with friends. Determined to start up a monthly collaborative “experimental brew” at my place, I began amassing oodles of excellent gear for a ¾-barrel BIAB system.
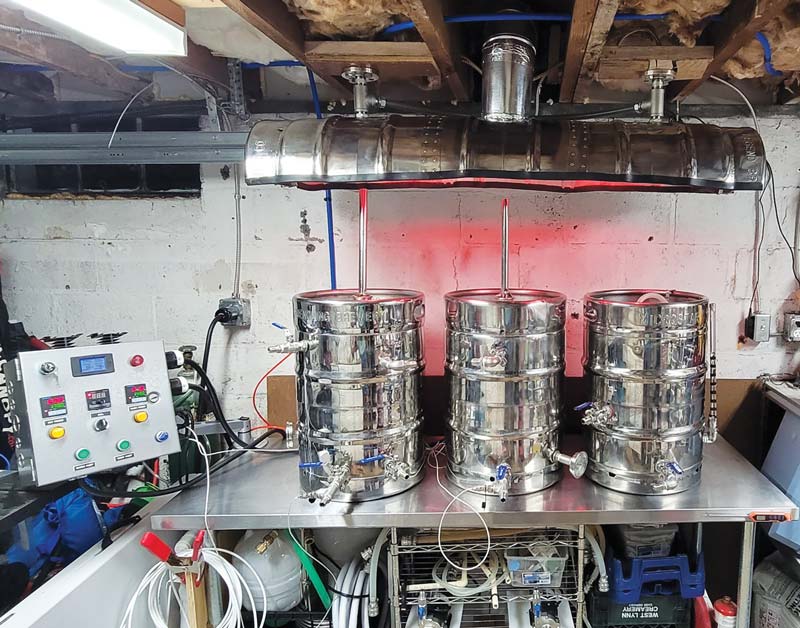
With the goal of being able to easily fill a 25-gallon (95-L) oak barrels in a single batch, I bought the Speidel 120L (31.7 gallon) HDPE fermenter. I tricked it out with some neat after-market gear (thermowell, etc.) and then began looking for cooling solutions — after all, we all know how important fermentation temperature control is!
Like many folks, I typically use a small fridge to control temperatures during fermentations, which works great, but the beastly 120L fermenter would not fit into any fridge I own. My first temperature control attempt was a set of two cooling jackets chained together, where the cooling jackets wrap around the fermenter and cold water is pumped through them. I found that trying to chill an HDPE fermenter from the outside with relatively small jackets was not going to work as well as I had planned. I had an especially difficult time lowering the temperature inside the fermenter at high kräusen. That quasi-fail led me to my next cooling solution.
I’d seen that some of the popular fermenter manufacturers make relatively costly drop-in immersion chilling setups for their conical fermenters. I knew I had to attempt to do this, so I began researching how I could create an immersion chilling system for my fermenter. I’m by no means a “handy” man, but I was able to put together a very nice custom system that actually works amazingly well, and was much less costly than an off-the-shelf system.


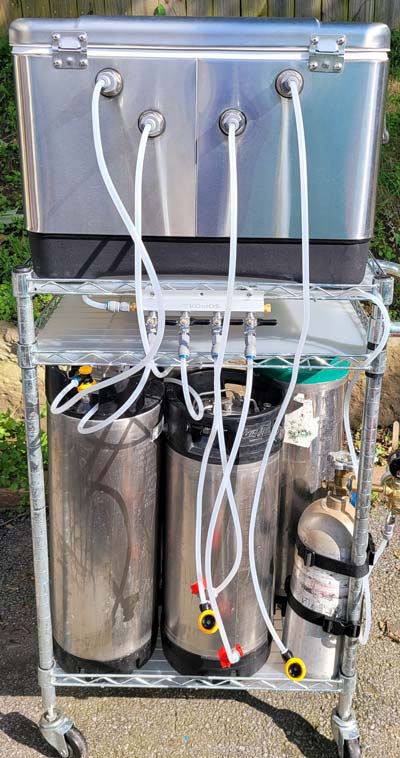
For my system, I used a low-cost 50 foot (15 m) stainless steel immersion chiller (3/8-inch stainless steel tubing) and cut the stainless tubing at the bend. I then attached a set of Brew Hardware’s TRUE Weldless Bulkhead with 3/8-inch compression fittings to the ends of the tubing. The end of the bulkhead that attaches to the chiller is a 3/8-inch compression fitting, while the other end of the bulkhead contains ½-inch NPT threads. After installing the fittings, I mounted them through drilled out holes in the fermenter lid and attached some Blichmann QuickConnector ½-inch NPT X ½-inch straight barb fittings. I then put a submersible pump in a cooler with ice water, and ran ½-inch vinyl tubing from the pump to the inlet of the chiller coil. A ½-inch tube is run from the chiller outlet back into the cooler. I leak tested the system and moved it into “production.”
I use a temperature controller to monitor the liquid temperature within the fermenter. When the temperature reaches a set value, the controller turns on the pump and flushes ice water through the immersed coil. Once the temperature is lowered, the pump is turned off. The natural “stirring” action of the fermenting wort helps the cooling process.
How well does it cool? I took 25 gallons (95 L) from 73 °F to 66 °F (23 °C to 19 °C) in under ten minutes during extremely active fermentation. If you can keep the water in the cooler cold, then you will have great success. For future iterations, I think I may put the cooling water in a bucket inside a small chest freezer. This may reduce the need to manually swap out ice bottles and cubes. Also note that you could fill the reservoir with warm water if you wanted to heat up the fermenter.
The concepts and techniques in this project will work in a variety of fermenters. The Speidel 60L (15.8 gallon) fermenter uses the same lid as the 120L, and is a good candidate for this project, as is nearly any bucket fermenter with a large lid. There are many places online where you can get stainless coils of various sizes, just make sure you get a coil that will fit through the fermenter opening and is tall enough to be submerged in liquid during your ferment.
For more cool brewing action and excitement, visit me on Instagram @aaronritchiebrewing and RitchieBrewing on YouTube.
| Parts & Tools |
| ½-inch ID vinyl tubing (length determined by how far your cold water reservoir is from your fermenter) |
| 50-foot (15 m) stainless steel 3/8-inch tubing immersion chiller (size of coil will vary based on your fermenter size, shoot for (5–7.5 square feet/0.5–0.7 square meters per barrel) |
| 2 TRUE Weldless Bulkheads with 3/8-inch tube compression fitting and ½-inch NPT threads |
| 2 hose barb fittings (1/2-inch male NPT x ½-inch hose ID) |
| Fermenter lid (using a spare lid is useful) |
| Water reservoir (ice chest) |
| Temperature controller |
| Tubing cutter or hacksaw |
| Drill with bits/Holesaw (The TRUE bulkhead calls for a 13/16-inch diameter hole) |
| Submersible pump (I use a 1,000 GPH pump) |
| Wrenches and screwdriver |
1. Prepare and cut the immersion coil
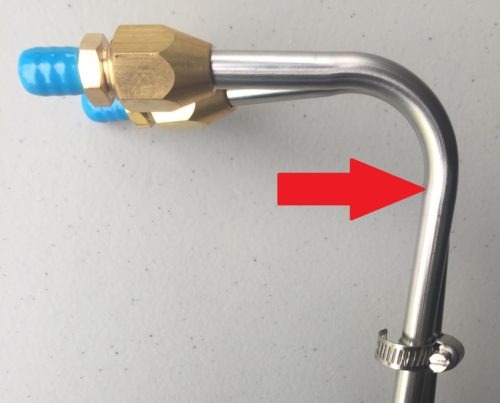
The first thing you’ll want to do is loosen and disconnect any hose clamps that will restrict your immersion chiller coil from being able to be cut. I used a “tubing and conduit cutter” that needed space to 360 degree swivel around the chiller tubing, so I had to be able to easily separate the two vertical pieces of tubing to make the cuts. Cut the tubing right below the curve at the top of the chiller (you likely will want to preserve as much vertical pipe as possible) this way the chiller coil will sit down deep into your fermenter and be fully submersed. If you have a shorter fermenter, you could use a coil with a shorter vertical measurement. Make sure to cut each of the two tubes in the same spot; you don’t want one vertical run of tubing to end up shorter than the other. After I made my cuts, I had about 14 inches (36 cm) of vertical tubing from the top of the coils to where the cuts were made. I then used the reamer built into my tubing cutter to remove the small burr created by the cutting process.
2. Attach the bulkhead fittings
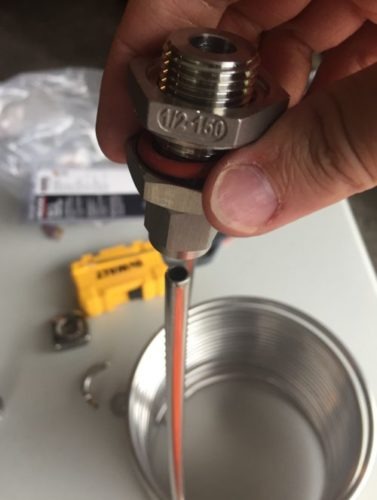
The next step of the process is to connect the compression fittings to the stainless tubing. Use two adjustable wrenches to tighten up the compression fittings. You will have the choice between a nylon or stainless compression ferrule. I used the nylon ferrule since it’s easier to work with, however the stainless ferrule is said to be able to hold more weight. Make sure your fitting is securely attached — it will need to hold the weight of a suspended immersion coil filled with liquid!
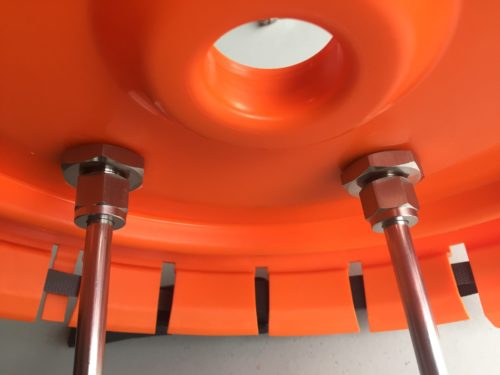
3. Prepare the fermenter lid and attach the coil
Set out your fermenter lid and think about where you want to drill the holes for your fittings. I used a spare lid that I purchased in case I made a mistake I would still have a backup lid. Imagine where you want the coil to be situated; for my fermenter I wanted the coil to be hanging right in the center. I held the coil’s fittings up to the lid and made a mark where I wanted to drill holes. Use your drill bit or hole saw to cut out two holes. You ideally want the fitting to just barely be able to pass through the holes you cut in the lid. Make your cuts, then attach your coil to the lid using the fittings. The ½-inch NPT threads will now be facing the outside of your lid. Attach the ½-inch NPT to ½-inch hose barb fittings to the threaded side.
4. Ice cooler, pump, and vinyl tubing setup
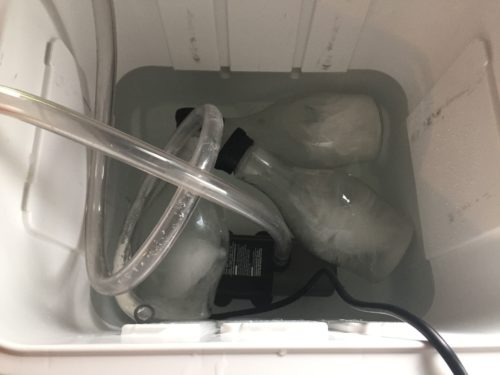
Fill an ice cooler with some cold water and add frozen bottles of water, cubes, or blocks of ice. Put your submersible pump in the bottom, and make sure it is in fact submersed under water. Hook up a ½-inch ID vinyl tube to the pump and run it into the barbed inlet of the immersion chiller. Hook another ½-inch vinyl tube to the barbed outlet of the chiller and run it back into the cooler. Plug the pump in and carefully inspect the cooling system infinite loop. Make sure there are no leaks, especially not ones that would leak liquid inside the fermenter.

5. Fermentation temperature controller
Here’s the brains of the operation — the temperature controller. In my setup, I have a stainless steel thermowell that is attached to the fermenter’s lid and reaches 14 inches (36 cm) straight down into the fermenter. I run the probe from the temperature controller down the thermowell and am able to accurately monitor the temperature of the fermenting liquid. I set my controller to kick on when the measured temperature is more than one degree Fahrenheit (1/2 °C) beyond a certain set temperature goal. As an example, I might set my controller to turn the submersible pump on whenever the temperature reaches 68 °F (20 °C), and have it run the pump until the beer is chilled to 66 °F (19 °C).

6. Production use
Put some delicious (that’s a requirement!) wort into your fermenter. Secure your lid with attached immersion coil to the fermenter. If your coil is fully immersed, you win! If not, then add more wort. Every so often, check to ensure that you are maintaining your desired fermentation temperature. If the temperature is climbing too high, it is a sign that you need to refresh your ice in the cooler. Make sure you keep enough frozen bottles or ice to be able to refresh the cooler when needed. One time I woke up and temperature had run much too high and my ice bottles in the freezer were not ready. I had to run to the store and buy bags of ice, which is when I learned that lots of ice cubes in a little liquid makes for excellent cooling when needed. You also may want to jacket your fermenter. I wrapped some Reflectix insulation around mine and secured it with Velcro to help hold temperatures longer.