Fermentation Heater
Fermentation temperature control can mean a world of difference in the quality of beer. One of my early hurdles in homebrewing was keeping my carboy cool enough through the warmer months. Too hot of a fermentation can encourage the production of fusel alcohols and esters leading to off flavors and aromas. This can be solved with water/ice baths, wet towels, and more advanced means.
Too cold of a fermentation is another problem altogether. Get your yeast too cold, and they may fall asleep before they get the chance to do their job. For some, this means not brewing in the coldest months.
When my daughter was much younger, I often found myself immersed in playtime with several of her favorite toys. I recall setting up my daughter’s Easy Bake Oven in my garage one day shortly after Christmas. The weather was cold and I was inspired. I mean, if a light bulb can bake a cookie, how well would one warm up my beer in the winter months?
Of course, there was the obvious hurdle of exposing a fermenter to so much direct light. Having always been taught that light can skunk a beer, I knew it was going to be a little more involved than sticking a light bulb next to my fermenter (for more on that, this column from Mr. Wizard).


Enter: The paint can heater. The plan was to enclose a lightbulb in a case that would radiate the heat generated from the bulb into the surrounding area, therefore raising the temperature of the fermenter, without exposing the fermenting beer to the light source.
My first results with a 60-watt incandescent bulb heated the paint can enough to raise the temperature in my chest freezer from 58 °F (14 °C) to 68 °F (20 °C) in just a couple of hours. Once there, the temperature held steady with my temperature controller.
A word of caution, a 60-watt incandescent bulb can get that paint can heater quite hot. I’ve since replaced that bulb with a 40-watt bulb, which still does the job. Even with the lower wattage, I don’t recommend using this next to or inside of objects that might easily catch fire. Avoid using in wood fermentation chambers, closets with clothes, or towels, cloth, etc. nearby.
For this build you will need a temperature controller unit that allows for heating. Beyond that, the build itself is quite inexpensive, costing about $12. I only made one of these, as it has worked for so long I haven’t needed to change it. If I were to build it again, as you may, I might do a few things to clean up the build a little bit, such as attach the pancake box a bit differently to avoid the screws sticking through the top. I could have also gotten away without using the spade terminals, but felt they were a nice touch. Those details may be determined by how picky and knowledgeable you are regarding DIYs, but even if you go with the basic design, I have to say it works great.
With summer upon us, now is the perfect time to build this project so it’s ready to keep your fermentations warm when the weather gets cool.
Parts List
Ceramic keyless lamp holder
6-foot (1.8 m) power cord (rated to 221 °F/105 °C or higher with ground recommended)
Strain relief/grommet
Metal round pancake box
Spade terminals (optional)
Aluminum paint bucket
Light bulb (incandescent or indoor flood, 40W max, 25W preferred)
Step by Step
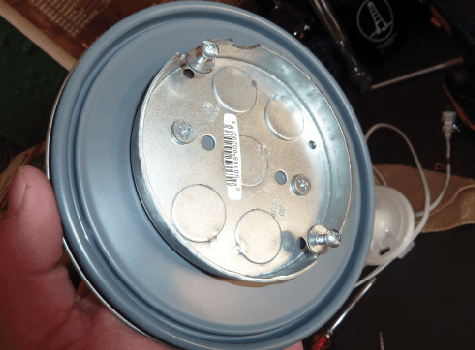
1. ATTACH PANCAKE BOX TO PAINT CAN LID
Begin by gathering all of the parts you will need. I found all of them at the local hardware store. The build itself is quite easy. Using a couple self-tapping screws or bolts, attach the pancake box to the inside of the lid of the paint can. I figured that once I attached the lamp assembly the cord might pinch, so I used a grinder to notch out a small section of the pancake box.

2. DRILL HOLES IN PAINT CAN
Drill a hole near the top of the paint can large enough to allow the power cord to pass through. Then add a grommet or strain relief for a cleaner finish and to protect the cord from the potentially sharp metal sides of the hole.
I also drilled a much smaller hole towards the very bottom of the can. The intention was to allow a little bit of light to escape the final build so I could peek into my fermentation chamber and look to verify that the heater was on/working and the bulb wasn’t burnt out.

3. RUN POWER INSIDE THE PAINT CAN
Cut off the receptacle end of the power cord. Run your cord through the top hole and separate a couple inches of the
cable. Strip the end of the wire and attach your spade terminals (if desired). Connect the terminals to the lamp assembly. Attach the wire with the ribbed side (HOT) to the gold circuit, and the smooth wire (NEUTRAL) to the silver.
*Please note: I was advised that it might be wise to use a grounded plug in lieu of the original build plans. If for some reason the hot wire comes in contact with the bucket, the ground wire may provide additional protection. The ground wire should be attached to the side of the can with a round stud ring terminal and bolt.

4. ATTACH LAMP ASSEMBLY
Attach the ceramic lamp assembly to the pancake box on the paint can lid and screw in your light bulb. I recommend a light bulb with wattage no higher than 40 so that the paint can does not get too hot. I originally started with a 60-Watt bulb, but a 25- or 40-Watt bulb will reduce the risk and work just as well. I have used both incandescent bulbs and indoor flood-style light bulbs with success. A reptile heat bulb might also be a good option.

5. PUT IT TOGETHER
Place the lid, complete with the bulb assembly, on the paint can. Make sure your wires aren’t pinched or in risk of being damaged for your application. Then put your fermentation heater in your fermentation chamber. Keep in mind, you will be generating a fair amount of heat, so you will want to use this inside something that can withstand it. I have used my converted chest freezer to date with no problems. Stay away from wood/cardboard containers. I measured the temperature of the paint can in operation for 45 minutes inside of my chest cooler with a 60-Watt bulb and the side walls of the can were sitting 140 °F (60 °C). However, if you want to be extra careful, you could place the can on a non-flammable insulated mat.
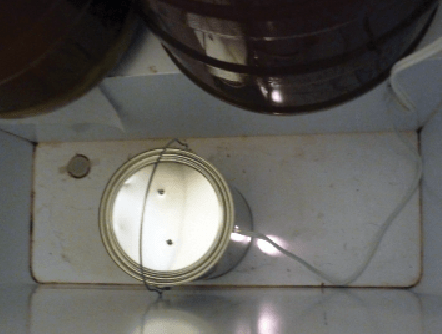
6. PUT IT TO USE
Brew, chill, and transfer your wort as normal. Once you pitch your yeast and are ready to ferment, put your fermentation vessels in your fermentation chamber with your new paint can heater. Plug it into your temperature controller, making sure you set it for heat instead of cold, and set the desired temperature. That’s about it. As you can see in the picture at left, the bottom placed light hole allows a little bit of light to escape without flooding the chamber with light.