What’s the first thing you do when you arrive at a new-to-you bar or pub? You look at the tap handles to see what kind of beers they’re pouring. You can find them in every bar, pub, and grill around the world. They first evolved in the 1930s when bars would often advertise one type of beer and pour a cheaper version. Laws were introduced to combat this, and required labeling of the beers actually being poured. This requirement evolved into a chance for brewers to market their beers with mascots, logos, and flashy designs to catch the eye of their would-be-customers (lowlander-beer.com, 2022).
There’s nothing quite like an ornate tap handle. In the United Kingdom you’ll find brass beer engines often with simple designs nothing about the brand of beer. In Germany, you’ll find classically stylized wood taps with ornate logos, some even light up. In America you will find tap handles shaped like fish, geese, pin-up girls, swords, surfboards, telephones, canoes, or trophies. The list is endless, and it’s a great place for creative minds to experiment. Despite all the variety, there’s still something missing from the list: Alterable digital screens.
I have been brewing for over 20 years now, and kegging for nine of those years. When it comes to dispensing I’ve used the default black handles, chalkboard tap handles, and recently installed a tapitgood.com Raspberry pi screen on my cold room (see “Building a Cold Room” January-February 2022 issue of BYO). While pondering new modes of tap handle labeling, I had a great idea: An e-ink screen faucet handle. No wires, no batteries, and preferably an easy method to flash a new image when new beers came online. Here’s how I designed and produced the first prototype.
. . . I had a great idea: An e-ink screen faucet handle. No wires, no batteries, and preferably an easy method to flash a new image.
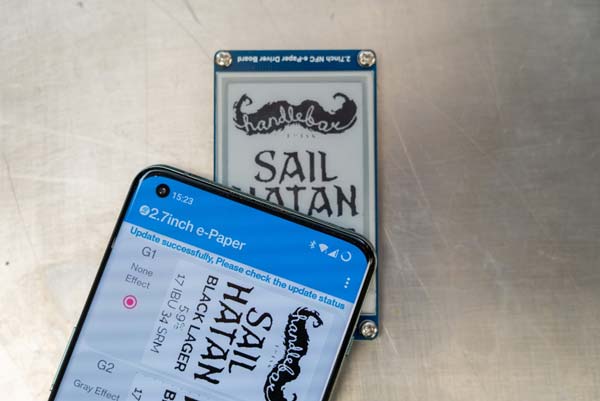
Most e-ink screens pair with an arduino, Raspberry pi, or just a USB interface and require special coding and a power source for the screen device (the “hat”). I didn’t want to make these tap handles with a USB connection or require anything complicated for programming. In short, my search has caused me to have a small collection of screens that were complicated to program or I couldn’t get to work at all. After a long search, I finally found Waveshare’s passive e-ink screens. They use near-field communication (NFC) and don’t require a power source. You load up an image in their app on your phone and hold the two devices in close contact. Voila! Modern magic. Note: As with most e-ink screens they are black & white.
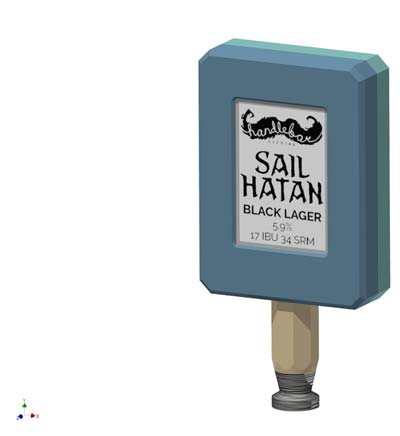
I designed my tap handle using CAD software. Here are links to the drawings and a 3-D model:
(2) aluminum blocks approximately 3 in. x 4 in. (8 cm x 10 cm)
(1) aluminum rod ¾-in. diameter x 2-in. length (2-cm x 5-cm)
(4) flat head socket cap screws M4x0.7 18-mm long
(1) socket head cap screw M4x0.7 12-mm long
(1) steel dowel pin 4-mm x 12-mm long
Mill access and anodizing finish (not pictured) optional
3⁄8 in.-16 UNC tap
Steps
1. Rendering of CAD model
Having access to a 3-axis Bantam Mill at my workplace, I took the opportunity to produce my first prototype out of aluminum. You could readily replicate this design with wood, steel, stainless steel, brass, or 3-D print it out of any number of materials. See links above the Tools and Materials list on page 58 for drawings and 3-D models.
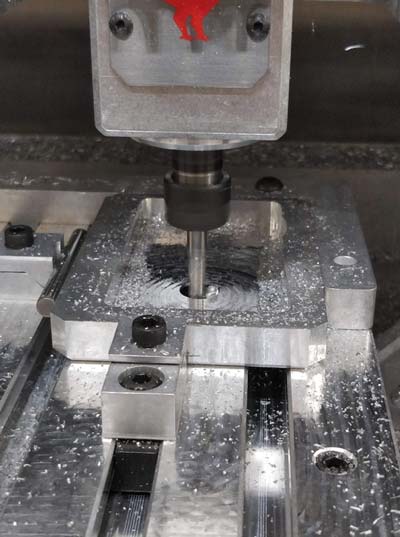
Starting with my aluminum bars, I cut them slightly longer than needed, approximately 110 mm (4.3 in.). I programmed the milling process using CAD software. I use Autodesk Inventor CAM since I have access to it at my work, but there are numerous free and paid alternatives to make G-code files for mills. I secured the parts in the mill, probed its location, installed the appropriate tools as needed and began the milling process. Starting with the perimeter shape, and the chamfered perimeter edge. The cover and base are similar enough, and only the cover requires front and back milling. The cover also requires a cutaway for the screen hole and additional chamfer.
2. Initial milling step
The backside of the cover requires a deep cutaway for the screen electronics, which if programmed correctly will open the screen hole from the previous step. While in this orientation I also programmed in the threaded M4 holes. These could be readily cut by hand, if needed.
3. Creating the stem
For the stem, I started with a 1-in. (2.5-cm) aluminum rod blank and wanted to form it into a sharpened pencil-look and match the taper of the threaded tap handle adapter that comes with your taps. Each face of the octagonal edges was flat-milled, and some degree of precision was required so after some trial and error of eyeballing it, and 3D printing a V-shaped nest – I ended up milling a V-shaped nest to orient and secure the round/octagonal shapes. Slight variation in the rotation or level resulted in non-parallel lines. I milled longer lengths of this rod with the intent of making multiple of these digital tap handles at once. Milling the sharpened-pencil shape also turned out to be a bit of a challenge, taking a few creative programming changes to get right by milling it vertically with a bull-nosed bit.
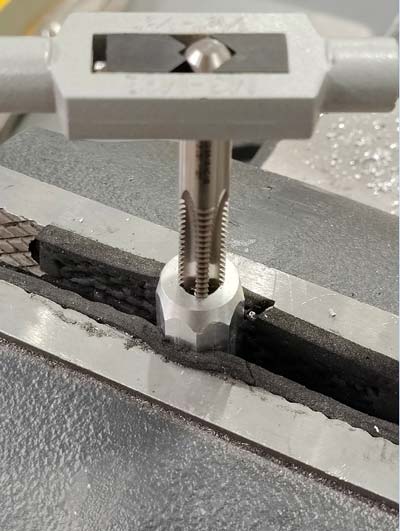
4. Tapping the stem
Using a printer-scaled template, I manually marked, drilled the cover, base, and tapped the stem. Care must be taken to ensure the holes line up for assembly. The clearance hole for the screw will have a small amount of play, but the dowel does not. If these holes have the wrong spacing you’ll be left with a gap between the mating faces. The thread of common American tap handles is UNC 3⁄8 in.-16. For shallow tapped holes, you need to use taper, plug, and bottoming taps in that order.
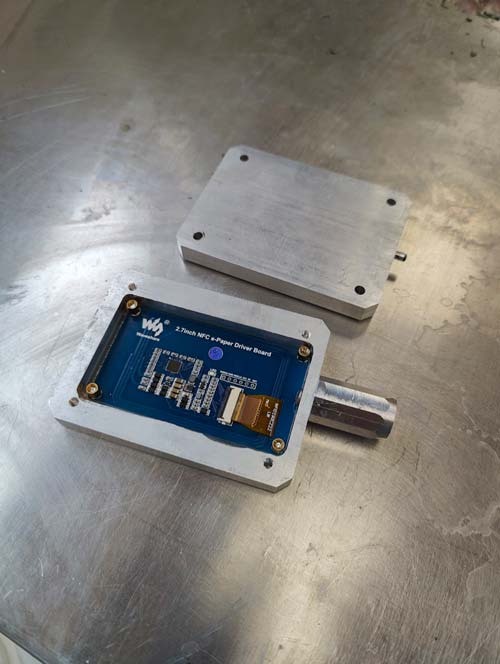
5. Putting The Pieces Together
I assembled the cover to the stem with a socket head cap screw. I installed the screen with a small piece of expanding foam on the backside to press it against the inside surface of the cover. Tape or putty would also work for this. The back must be slid onto the dowel pin on the stem. If the spacing isn’t right, you can adjust the cover slightly. Once you get it right, you should mark the location with a sharpie. With the base in place, the four flat head screws complete the assembly. You can avoid the dowel or widen the hole tolerance if needed. Without it, however, an inebriated pull on the tap handle could potentially break the small screw holding the cover on.
6. E-Ink Display
Thread your fancy new wireless tap handle onto the nearest beer tap. Using your smartphone and manually installed app you use NFC to flash an image or text of your choosing onto your e-ink screen. Everyone is going to be so impressed with you while enjoying your beers.
After this prototype build, I still have some work to do. The screens are passive, so even when the screen is in contact with your phone it doesn’t always flash a new image correctly. The aluminum cage I’ve put it in might be making this worse. A dedicated NFC repeater might help, but it’s a challenge to be certain I find one that can repeat image data instead of just alpha-numeric data. The last step to finish up this project is to send my milled aluminum pieces to be clear anodized. Total cost of this (aside from the mill, design time, and machining) was less than $40. The anodizing will really make for a nice finish, but I’m going to have to make a few more to make the $100 batch fee worth the cost.
Tired of bottling or looking to have a better serving option for your kegs? Build this chalkboard kegerator to have your own three-tap servi
This website uses cookies to improve your experience. You can opt-out if you wish.AcceptRejectRead More
Privacy & Cookies Policy
Privacy Overview
This website uses cookies to improve your experience while you navigate through the website. Out of these, the cookies that are categorized as necessary are stored on your browser as they are essential for the working of basic functionalities of the website. We also use third-party cookies that help us analyze and understand how you use this website. These cookies will be stored in your browser only with your consent. You also have the option to opt-out of these cookies. But opting out of some of these cookies may affect your browsing experience.
Necessary cookies are absolutely essential for the website to function properly. This category only includes cookies that ensures basic functionalities and security features of the website. These cookies do not store any personal information.
Any cookies that may not be particularly necessary for the website to function and is used specifically to collect user personal data via analytics, ads, other embedded contents are termed as non-necessary cookies. It is mandatory to procure user consent prior to running these cookies on your website.