Pouring for Flavor
As a beer professional of almost 30 years specializing in draft beer and beer service, I’ve worked with a lot of bars, restaurants, and taprooms on pouring beer. A lot of that discussion revolves around pouring beer a certain way, with intention, and getting a good collar of foam on the beer. The emphasis on foam is because beer itself actually tastes different when foam is poured on top.
One of the main arguments for foam revolves around aromas and their preservation. Beer has a whole lot of aromatic compounds floating out of the glass, which are an essential part of its flavor profile. These compounds get trapped inside the millions of tiny bubbles in foam. As the bubbles slowly pop, they are releasing those compounds, which then rise out of the glass and up to your nose. It’s like a slow, controlled release of aroma, which prolongs your enjoyment of all that goodness. In the absence of foam, those aromas will dissipate more quickly, and you won’t be able to enjoy them as much.
That’s certainly a good reason to pour foam on your beer, but there’s much more to it than that. As it is, there’s a lot that foam can contribute on its own to beer’s flavor and mouthfeel. In fact, by using specific equipment and pouring foam in varying amounts and in different ways, we can create different flavor profiles from the same beer. I’ve spent a lot of time in the past few years learning about this in the research, development, and eventual execution of my pop-up concept, Ritual Pour. With Ritual Pour, I pour one beer but offer it seven different ways. Each pour is distinct and tastes different than the other.
To understand how this is done, we need to explore foam itself, including how it’s created and what foam creation does to the beer underneath. This will aid in understanding how different pours can create different flavor profiles. Then we can talk about what equipment will best help us create these pours.

Types of Foam
Foam is the result of dissolved carbon dioxide (CO2) breaking out of the beer and forming stable bubbles on top. This stability is due, in large part, to the presence of proteins and bittering hop compounds. These work together to stabilize the bubbles on top of the beer and keep them from rapidly collapsing.
The fact that foam is stable allows us to create different types of foam. The type of foam that arrives on the standard pour at a bar or restaurant, the one most American beer drinkers are familiar with, is a relatively dry foam. Most of the liquid in between the bubbles has drained, leaving it light and airy, with a more rigid composition. In some cases, this can approach an even meringue-like consistency.
Some foam, on the other hand, is more wet. Wet foam has much more liquid in between the bubbles, which makes it much more fluid. While it still maintains good stability in most cases, it is fluid enough that it can be drunk right from the glass, just like the beer itself. It should be noted that wet and dry in this context are relative terms, rather than set terms. They are simply describing a sliding scale of the liquid content and the fluidity of foam. Some wet foams can be wetter than others, and some dry foams can be drier than others.
Wet foam and dry foam don’t just differ in consistency. They also differ in flavor. The flavor of dry foam is often perceived as being more bitter, while wet foam carries the perception of being sweeter. This is likely the result of a few factors. As noted earlier, bittering compounds from the beer are a key part of foam stability. As bubbles form, these bittering compounds form structures with proteins and other compounds that provide stability to the bubbles. So, while they make bubbles more stable, they also make the foam slightly bitter. This bitterness is typically more noticeable in a dry foam, which has less beer around the bubbles. In a wet foam, there is much more beer around the bubbles — beer that has likely given up much of its bitterness to the bubbles — and is thus sweeter. This sweeter beer balances the bitterness of the bubbles, lending to the perception of sweetness in the wet foam relative to the dry foam. Additionally, this perception of sweetness is aided by the creamy mouthfeel of the foam when drinking.
Regardless of whether the foam is wet or dry, the formation of foam from beer will result in a beer that has less perceived bitterness. This is due to the loss of bittering compounds noted above, but is also a result of the loss of carbonation as foam is formed. Dissolved CO2 provides a certain mouthfeel and flavor to beer. It has a certain acidic taste and a prickly mouthfeel, both of which accentuate bitterness in beer. So, as carbonation is knocked out of solution, the perception of sweetness in the beer will increase, not just from the loss of bittering compounds in the beer, but also from the loss of that bitter-accentuating carbonation.

All of these details are what make up the variables of the different pours. By creating varying amounts and types of foam, we can influence perceived sweetness, mouthfeel, and flavor of the beer, and can produce several distinct pours from the same beer. Now that we know the variables, I want to touch on some of the equipment and technical details, without which we cannot pour quality beer at all.
Factors in Pouring
First of all, the cleanliness of the draft system is paramount. I clean my dispensing system before and after each use, using a 2–3% caustic solution in hot water. Mine is a single-
faucet, direct draw system, so cleaning with a recirculation pump is not practical. I fill the system with the caustic solution using a cleaning canister, then let it sit for at least 20 minutes. During that time, I disassemble and clean my faucet and scrub it with a brush. After the 20 minutes of soak time, I rinse with fresh, cold water. This cleaning is one of the most important things to do. There is a direct line between dirty draft systems and poor-quality beer.
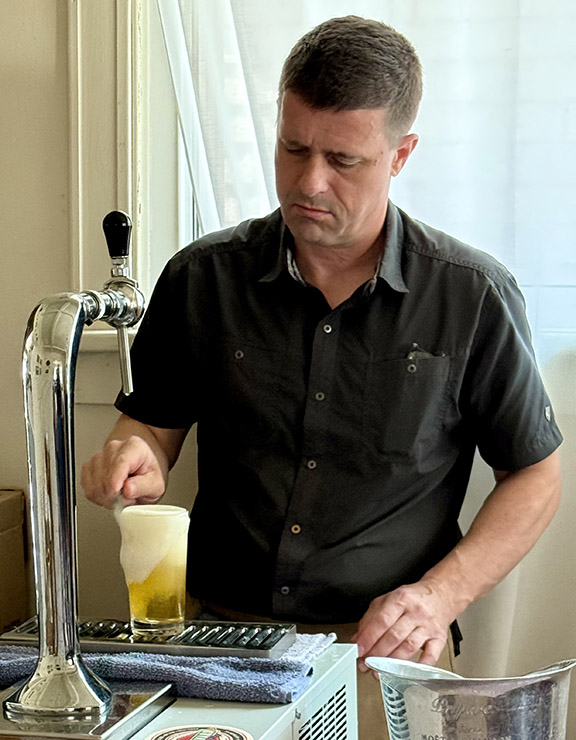
Temperature control of the system is also incredibly important. To control the foam during pouring, you must have control of the temperature of the beer. Serving beer between 36–38 °F (2–3 °C) is a good target. This can be accomplished with a traditional draft system or with a temporary, mobile system. Mine is a mobile, tabletop, refrigerated unit, called a flash chiller, with a tower on top (pictured on this page). This type of system is not common in the U.S., but is very common in Europe. The refrigeration unit inside chills a water bath, through which the beer coil runs before running up into the tower and faucet. This cools the beer to the desired temperature very efficiently and allows me to keep the beer at a bit warmer temperature, usually on ice, underneath the table. Without proper temperature maintenance, the beer may come out too warm, with too much foam, or too cold with not enough gas breakout.
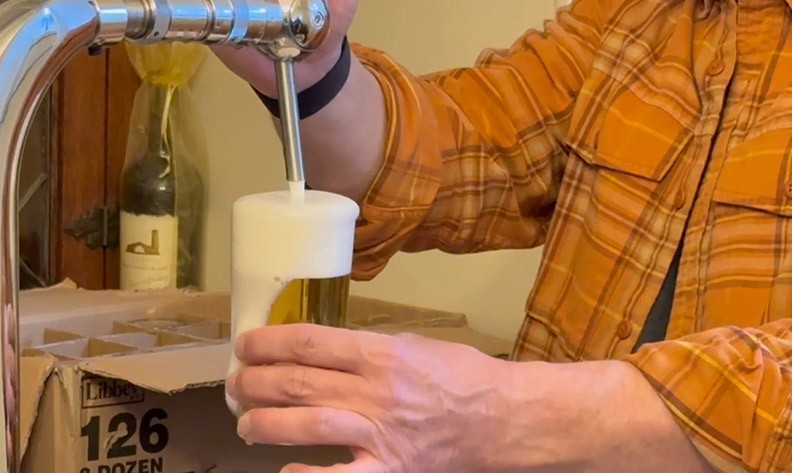
The faucet I use is a roto-style, ball-valve faucet, often called a roto-tap, which has a longer, relatively narrow spout. This particular one has a flow control feature in the shank, which allows me to control how fast or slow the beer comes out. When the faucet is all the way open, I get clear beer. When it is partially opened, it produces foam. The long, narrow spout constricts the foam as it comes out, allowing me to control it better in the glass.
There are other styles of faucet that can produce the types of foam needed for the different pours. One that has become popular in recent years in the U.S. is the LUKR side-pull faucet from the Czech Republic. This, like the roto-style faucet, is a ball valve, but has a different shape and spout size. It features a screen in the nozzle that helps to produce a wet foam and also prevents larger bubbles, which can accelerate the collapse of the foam. The shape and angle of the faucet make it uniquely suited to pour into a 0.5-L dimpled mug, known as a Tübinger, which is a very common glass in the Czech Republic. However, it is less suited to pouring some of the pours I offer with Ritual Pour.
The glass I use is a simple 10-oz. (300-mL) straight-sided glass that is relatively unremarkable as far as beer service goes. Much has been written about the impact glassware shapes and sizes have on how beer’s aromas and flavors are perceived, and I am a firm believer in using proper glassware. However, the concept of Ritual Pour features how different pours impact beer flavor, not glassware. By using a simple glass for every pour, the differences from pour to pour become more apparent.
The aspect I do focus on, however, is that of cleanliness. I go to great lengths to ensure that every glass is “beer clean.” It must not only be free of soil but also free of fats and oils from food and some detergents that can cause foam to collapse. I use a portable glass cleaning station called a Spülboy, which allows me to present a freshly cleaned and rinsed glass to every customer.
This equipment setup sets me up to easily deliver beers poured in multiple ways. Detailing these pours should provide an understanding of how the different beer and foam characteristics can come together to deliver different flavor profiles.
Different Pours
One of the most popular pours I offer with Ritual Pour is called the sharp pour. Many of the pours I offer are based on those offered by some of the famous pouring masters in Japan. The sharp pour is based on a pour offered by Hiroshi Shigetomi of Beer Stand Shigetomi in Hiroshima, Japan, among others. This pour begins by opening the faucet, then putting the glass underneath the stream of beer, allowing the first bit of foam to go down the drain. Then I pour a slow, deliberate stream of beer down the side of the glass with as little foam breakout as possible. Once the glass reaches about 70% full, I stop the flow and remove the glass from under the faucet. Then I partially open the faucet, getting a steady flow of foam, and then introduce the glass under the stream of foam, filling the glass to the top. As the foam reaches the top, there is a fluffier, drier foam on top of the wetter foam poured earlier. Instead of stopping the flow when the glass is full, I let the drier foam overflow the glass until all that is left is wet foam on top. I then skim off, or “cut” any larger bubbles off the top with a foam knife to preserve the foam.
Because none of the foam comes from the beer that is poured in the glass, the beer retains all of the carbonation, with all the bitterness and sharpness on full display. Contrasting that is the foam on top, which is wet, sweet, and liquid, with a creamy mouthfeel. As the beer is consumed, the sweet foam blends seamlessly into the sharper, more bitter beer, with those contrasting elements balancing each other out very nicely.
It’s worth acknowledging that this pour (and some of the others) involves a certain amount of beer loss. This amount, however, is not very substantial. During a typical pouring session, with the sharp pour being the majority of those ordered, my total loss is usually just over 15%, including the waste at the beginning and the end of the keg. This is not dramatically more than what would be considered standard loss in a draft system.
Another pour I feature is called poured once. This begins as a relatively agitated pour that creates a larger head on top. I let the drier foam on top run over, leaving wetter foam on top. As the foam settles, I cut the larger bubbles off with a foam knife and the beer-to-foam ratio settles in about 7:3. The wet foam here is not quite as wet as the sharp pour, and is thus not quite as sweet. The beer underneath has some carbonation knocked out in the pouring process, so it is not quite as bitter as the sharp pour. This pour features the same type of sweet foam-to-bitter beer contrast as the sharp pour, only not as stark.
Poured twice begins as an agitated pour with a large amount of foam breakout. Then the beer is allowed to rest, which creates a drier foam cap on top. After a minute or two, the beer is poured again with some agitation, and the dry foam is allowed to run over, leaving wet foam behind. The extra pour reduces the carbonation further, making the beer sweeter with a creamier mouthfeel that complements the sweet, wet foam on top.
The mild pour takes this even further. This beer goes through a third agitated pour, which makes the beer even sweeter and creamier. The dry foam is again left to overflow down the drain, leaving the wet foam behind. This lessens the bitterness significantly, with a very mild, sweet flavor from beginning to end.
Poured three times is poured similarly to the mild pour, only during the last pour, the fluffy, dry foam is allowed to stay, towering over the rim of the glass. This provides a sharper, more bitter flavor from that dry foam, which contrasts with the wet foam and then the beer underneath.
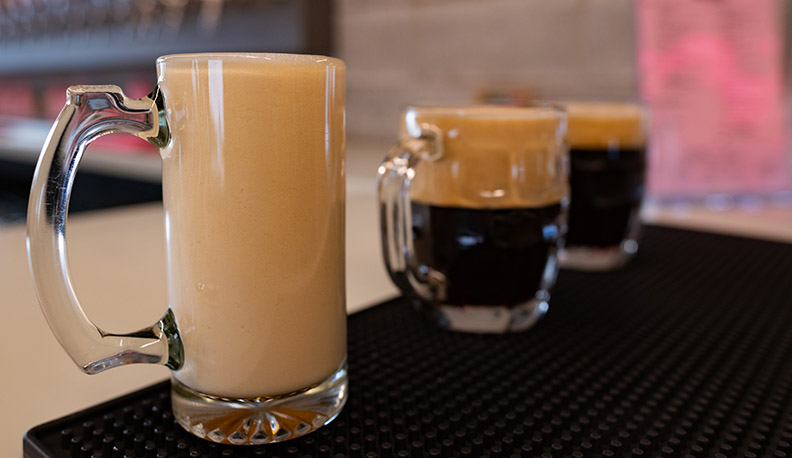
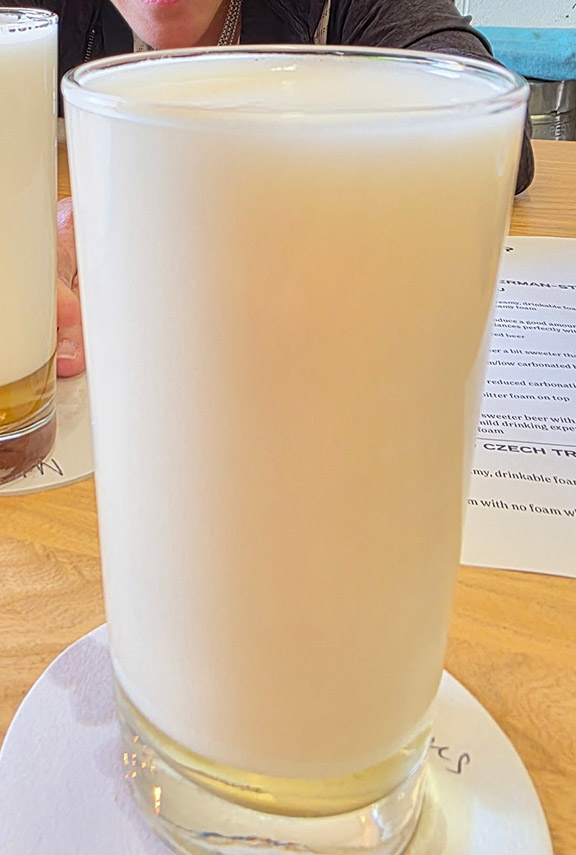
Another pour I offer is the milk pour. This is based on a mlíko pour common in the Czech Republic. It is a glass filled to the top with wet, creamy foam. This is somewhat of a novelty that allows the drinker to experience the sweetness and creamy mouthfeel of the foam all by itself.
One last pour I offer is no foam, which is another novelty pour and is exactly what the name implies. The beer is poured slowly, all the way to the top, with no foam breakout. Every bubble is then cut from the top with a foam knife. The beer retains all of its bitterness and sharpness, with no creamy foam to balance.
Application
Each of these pours has a different flavor and mouthfeel from the others. By manipulating foam and carbonation through the pouring process, bitterness and sweetness can be emphasized or minimized in both the foam and the beer. Sometimes they contrast and balance each other out, and other times they are complementary and serve to enhance each other.
With an understanding of the different pours, it’s worth discussing the value in this exercise in the first place. For some people, this type of beer service is a novelty. American beer culture doesn’t have a tradition of manipulating beer flavor with pouring techniques, and demonstrating this with Ritual Pour is a curiosity for many, but also a great way to
introduce people to other beer cultures. In addition, featuring beer this way gives customers a choice in how they like their beer presented. As I’ve held my Ritual Pour events more and more, I’ve had many return customers talk to me about what their favorite pour is. Some like the contrasting balance of a sharp pour while others like the more mellow flavors of a mild pour. It gives customers a choice they never had before. And once they discover this, they can start to cater the pour to the style of beer. They may want to mellow the harsher bitterness of an IPA with a poured twice or to emphasize the bitterness with a sharp pour. There are many combinations of beer styles and pouring styles that customers may choose from.
One last reason I have for doing my Ritual Pour events is it’s a great way to emphasize the importance of intentional pouring. I worked for many years in field quality for a regional brewery in the Midwest. In that role, I witnessed lots of great beer being poured into a glass with no intention whatsoever, often resulting in it not tasting nearly as good as it could have. Ritual Pour is a tangible demonstration that how beer is poured really does make a difference.
The reception to my own pouring demonstrations has been overwhelmingly positive. It presents beer in a way most people in the U.S. have not experienced before. Although this style of pouring might not be well-suited for every nanobrewing taproom, there are still elements that a lot of them could learn from, particularly the emphasis on pouring with intention and delivering quality beer at the point of dispense to the customer — something that has sadly been lacking in many places.

