
Stuck Lauters
Of all the brew day steps fraught with anxiety, the worst is a dropped glass carboy. Now, if you follow our recommendations and don’t use carboys anymore, the dreaded stuck sparge gets promoted to the top spot. You open the mash tun valve (or your preferred mechanism to officially let the wort fly), but instead of being greeted with a steady flow of sugary malt goodness, you are confronted with a disappointing drip of no joy. The gremlins have struck!
But no need to look to the sky for Mash-Man to come rescue you. You are a complete brewer. You have the tools to ensure a free-flowing mash.
It Happens to the Best of Us
We speak of this from experience — or at least Drew does, with one of his early batches. Picture this — it’s February 2001, a bright SoCal winter’s day of 60 °F (16 °C), and Drew decided to join an early morning crew for a club brew. It started with big plans: “Let’s make a double decocted Bohemian Pilsner with proper undermodified Moravian Pilsner malt!” Look, these are the bets you make with yourself from a place of blissed-out ignorance because the crew thought “we’ll just put this through a low rest and a high rest, and beer!” Turns out that “undermodified” thing was important and the batch stuck.
When Drew says “stuck,” you might be thinking “oh, it flowed really slowly and it just took a while.” Dear reader, when Drew says stuck about this batch, he means half shy of concrete. It was barley goo. Not a drip dripping! Nothing doing. The crew tried most of the things spelled out in the article and finally had to accept 20ish gallons (~75 L) of imperial Pilsner (1.127 OG) instead of the 40+ gallons (150+ L) of 1.060 Pils they intended.

Also, instead of the intentionally long brew day ending around 5 p.m., Drew closed up the clubhouse at midnight. This might be why he remains allergic to decoction mashing two and a half decades on!
Why Do We Do This?
All things considered, what we think of as the typical “mash/lauter/sparge” routine is a relatively recent trend. For millennia, brewers brewed slightly settled “porridge” filtered via straw (ala Akkadian, Babylonian, and Egyptian). Medieval brewers used techniques like woven baskets driven into the mash with wort dippered out. And more modern practices used multiple mashes to create several beers instead of lautering (which we recommend everyone try at least once – see parti-gyle brewing).
In the early 1800s, the Germans popularized what we think of as fly sparging — rinse the grains, save money by extracting every bit of sugar, and combine the wort into one kettle for energy and labor efficiency. This, FYI, is a gross simplification of history and the many varied techniques still in use around the world today.
And for the longest time, all-grain homebrewers copied the fly sparging brewing technique <points at the big brewery kettle> “because that’s how it’s done.” But, naturally, homebrewing is a different cup of tea, and we can do things that aren’t practical on the big scale. Large stainless-steel vessels are serious expenditures of capital and space on the commercial scale. For homebrewers, what’s the difference between a 5- and 10-gallon (19- and 38-L) pot? So, homebrewers rediscovered different ways to sparge and lauter — like batch sparging or the even more heretical full-volume Brew-In-A-Bag (BIAB) mash.
Given the de-emphasis on sparging, you may wonder why we are still devoting a full column to the subject? Simple, because we’re not worried about a stuck sparge — we’re worried about a stuck lauter. Whether or not we rinse the grains matters not a single whit, just whether we can separate the liquid from mash solids.

What went wrong?
On a normal brew day, you expect that as the mash ends, you can open a valve or lift a basket or bag, and wort freely flows from the confines of our barley gruel. If we’re sparging at all, we’d expect the water to flood the mash and soak through all the nooks and crannies to extract all the sugar we’ve just shepherded into creation. But clearly, it’s all gone wrong, and we must put on our very best thinking caps to suss out why.
The Mechanical
The first thing to check is the dreaded “duh” check. Are we sure the system is set up correctly? Are all the appropriate valves open? Have the vital pumps been primed? Is the filtering mechanism still in place? We cannot tell you the number of times we’ve accidentally knocked loose a vital hose or pipe in the process of enthusiastic mash stirring. So, first step — stop, take a breath, and physically use a finger to trace the flow path. Are there any hoses kinked or closed connections?
Next is the dreaded blockage. Are your valves clear and flowing? Particularly with earlier model all-in-one setups, the included pumps could easily get jammed with grain, which caused recirculation problems. And ball valves are notorious for their tendency to jam. An easy way to tell if there’s a blockage is to work backward through the system, unhooking connections one at a time. (Keep a pitcher in hand to catch any drips or sudden dramatic dam bursts.)
Speed is another concern here — did you attempt to fleetly flow like a champion thoroughbred out of the gate? You could have inadvertently created a massive suction event that compacted the grain bed with enough vigor to stymie all flows. This is particularly a problem if you have a pump on your mash tun and aren’t careful! Try reflooding and remixing the grain bed, then start with a gentle stream instead of a raging torrent.
One last thing to check — were you trying to exceed the weight rating of your mash filtration device? When we used to use braids for filters, this could be a real problem. Get enough wet mash on top of a flimsy braid or plate, and it will collapse, cutting off your flow. (The solution: Remove some of the mash and filter it separately!)
Goo Factor Ten
Assuming that your mechanicals are sound, the next step is to break into the mash itself and understand why we’ve made a big ball of dough instead of a happy-go-lucky barley soup. Starting with the basics — did you actually add enough water to the mash? If the mash is too thick, it won’t flow. Remember that grain will soak up approximately a half pint of water per pound of grain (which at a typical mash ratio is ~20–25% of your strike liquid). Normally this shouldn’t be a problem since the average recipe design will account for it. But when you’re being a daring and intrepid brewer and doing extreme things (like a super high-gravity brew or squeezing every last pint of capacity out of your system), you’ll be tempted to short the mash water-to-grain capacity. Our recommendation is don’t go below 1 quart/pound (2 L/kg) to avoid this and other problems that may arise from a stiff mash.
The Grain Itself
Barley has been specifically tailored by brewers to be the perfect grain for making beer. With modern malts and proper mashing routines, the barley shouldn’t be an issue. (For the exception, see Drew’s story at the jump, “stupid old-fashioned malts needing to be mollycoddled with a beta-glucan rest of 105 °F/41 °C.”) It’s when you step outside the modern barley zone that things become more worrisome. With so many of today’s recipes calling for large doses of wheat, oats, rye, and more, you may run into trouble. Oats and rye, in particular, can lead to very gummy mashes from the complex starches and proteins in the grains. Think about how sticky a bowl of oatmeal gets and imagine trying to pull water from that mass!
At recommended usage levels (0–20% for rye/oats, 70% for wheat in Bavarian hefeweizen — eep!), you usually won’t see much of a problem — there’s not enough goo and more than enough husk material to keep your mash flowing. Remember, barley has the all-important husk material where brewing oats, rye, and wheat generally don’t. When you start going above these levels, an addition of rice hulls is cheap insurance to keep your hair attached to your scalp and the wort flowing through the grain bed.
I’ve Cracked and Lost My Groove
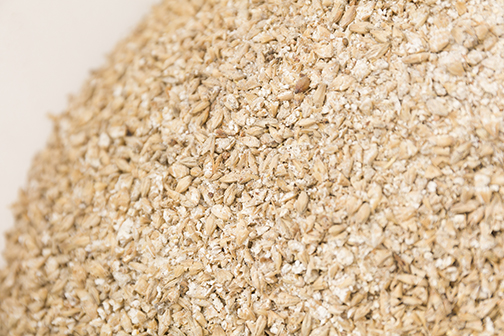
We may have overstated how easy working with barley is. It can also be problematic, but generally only when we make a mistake by crushing the grain too fine. (Homebrewers more commonly have the opposite problem — a too coarse crush that never converts completely and keeps starch and sugar to itself). While our motto is “crush until you’re scared, and then crush a little more,” you can overdo it. You want the barley crushed into tiny grit with some powder and mostly intact barley husks to serve as liquid conduits. Too much flour and you will create a husky barley flatbread dough. Word of advice: Set your mill, but always double-check your crush before mashing in! Think cornmeal, not all-purpose flour!
How Do I Fix It?
By now, you’ve come to one of two conclusions — “Aha! That’s the culprit,” or “Dude, I literally do not care, just get me out of this situation.” Either way, let’s find out what solutions we have for you. First, stop and take a moment. You have time to frizzle away the frazzle. Maybe a sip or two of beer, and then onward.
Preventative Measures
It’s better to prevent a problem than to fix it. To that end, if you have any worries or paranoia, use rice hulls. When Drew and the Maltose Falcons ran a large 55-gallon (210-L) brew system, the rule of thumb was always to add rice hulls to prevent problems from the weight of the mash. For home use, adding a pound (0.45 kg) of the flavorless husk material that costs a couple bucks to a 5- or 10-gallon (19- or 38-L) batch prevents your brew day with $50+ worth of ingredients from becoming a dreaded hassle.
You can mix them into the grain, sprinkle them on the bottom or stir them into the mash (even a stuck one). Some advocate for soaking or cleaning the hulls first, but we’ve never bothered. They also work great with a brew-in-a-bag/basket setup.
Hindsight Isn’t Helping
You didn’t add rice hulls, so now what? Let’s run the list of potential fixes from gentle to meaningful violence. After these techniques, you’ll want to recirculate the run-off as you’re intentionally disturbing the mash bed. Make sure to start with a slow run-off to avoid resetting the bed.
Cut & Stir – A gentle cutting of the mash or a stir, all the way to the filter mechanism, may be enough to break whatever has clogged the filter bed. (And you can add rice hulls here, too.)
Blowback – Sometimes pushing water, air, CO2, etc. through the outlet can clear a blockage in the filter mechanism/valve. Be wary though, this is often a very temporary fix with 10–30 seconds of flow. It could even unseat an internal connection.
The Float – A more intense form of the blowback. Push a gallon (4 L) or more of water back through the outlet, give a quick stir, and go. You could just add water to the mash and stir, but underletting is used in a lot of professional setups as a way to clear the lauter.
The Hail Mary – None of the previous steps have helped? Well, that’s no good. We’ve crossed the line from gentle solutions to full-on manhandling. It’s time to get “violent,” and by violent, we mean carefully and gently removing the mash, checking the whole system, rewarming the mash with hot water infusions and rice hulls. Basically, at this point you’re trying to create a new lautering bed. It may work. It may not. There may be hot-side aeration. There may be tears.
The other thing to stop and consider at this point is whether the labor is worth the end product? You’ll notice that Drew’s first story ended up with a shorted volume at higher gravity. The crew decided to wait and see what they could slowly collect over the course of hours before boiling. For Drew’s first “Winter Saison” project, he and a brew partner got into the same world of hurt, and instead of collecting 11 gallons (42 L) of 1.080 wort, they sat, ate a burrito, drank a Fantôme, and decided to throw in the towel — only to discover 5.5 gallons (21 L) at 1.120 wort waiting to be boiled!
And finally, you might just have to bite the bullet and realize “well, I done goofed and wasted a day.” And that’s OK. There isn’t a single one of us who gets through life being perfect with an unblemished record. Take it as a chance to learn so you hopefully, maybe, don’t make the same mistake again.
Reflections on a Failed Mash
1. Did something change in your system? Maybe something obvious like a new false bottom or mill, or something less “mash-oriented” like a pump.
2. Did you change your process? A little change — including things like changes to water chemistry, the way you began your run-off, or your milling process. The number of times milling has bitten us in the butt is too great to count. Always watch your crush so that it’s not too fine (making a claggy mash ball) or too coarse (leading to low efficiency).
3. Did you use a new ingredient? Remember at the jump with Drew’s hellish decoction mash and a previously unused “undermodified” malt. They should have done some reading first to know what it needed!
a. Don’t be afraid to reach out to a malt company as well. They can usually tell where a grain can steer you wrong. They have a ton of scientists on staff specifically to understand what their product needs!
b. On that undermodified malt bit – other than romanticism, there’s relatively little practical flavor reason to use them these days, but if you feel the calling — the yearning for the olden days of brewing — look up older mash schedules that include rests in the 95–100 °F (35–38 °C) range to activate enzymes that will remove the gum.
4. Lastly, consider: Did you anger the beer gods recently? Consider repenting by brewing a simple batch to prove your humbleness (and prove out your process again).
Remember, the brewing war story may not be worth the time, tears, aggravation, and sweat. It’s OK to toss in the towel. We’re hobbyists — this is our downtime. This is fun, and if you’re not having fun, it’s OK to chuck the mash and come back another day. There’s no great brewing professor in the sky grading your efforts to determine what beer you get in the afterlife!
So, our last lesson, the last fix in the list — give yourself some patience. Give yourself some grace. And maybe give that stuck lauter one more gentle stir.
Further Reading . . .
Learn more about the ideal crush size for your grain and how it impacts your brew.


