As a homebrewer, my goal has always been quite straightforward: Make beers better than the ones I can buy. Though far easier said than done, this goal has always resonated with my competitive nature and desire to place my best efforts in all that I do. It has influenced me to research and learn as much as I can about this beautiful hobby and has motivated me to continuously improve from one batch to the next. This journey has led to concepts and practices that have changed my brewing forever: Fermentation control, water chemistry, and what I consider the most crucial for beer quality, the ability to minimize/eliminate oxygen contact post-fermentation.
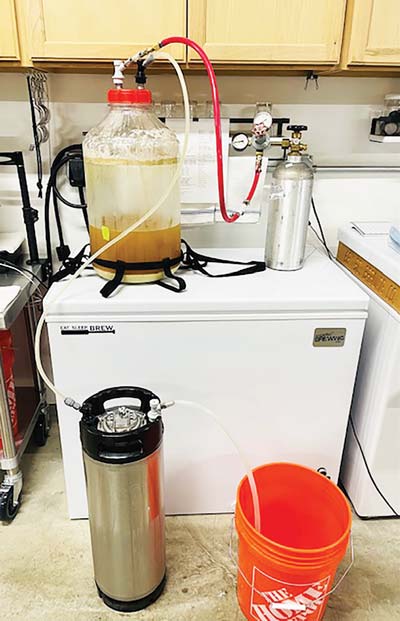
When I started looking at ways to achieve that final concept, I decided it was time to upgrade my equipment to be able to put this practice into place. I quickly realized that stainless steel equipment with closed transfer capabilities was out of my comfortable price range and their PET counterparts were not much different than the PET FerMonster that I already owned. The big difference was the fact that they had liquid and gas connections for transfers. It was at that moment that I realized with a drill bit and a few parts I could convert my FerMonster to do the same thing. It didn’t take long to put this idea to use.The next day, the modified FerMonster lid with closed transfer capabilities was born.
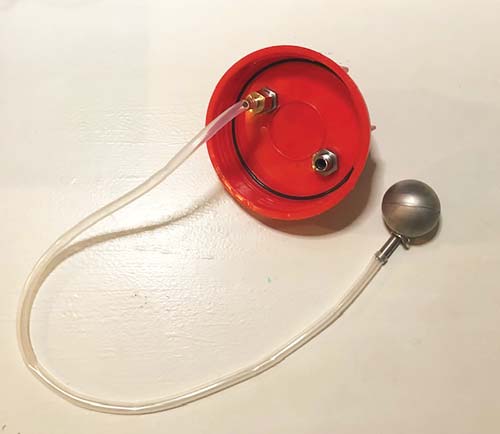
For this DIY project you are simply drilling a solid FerMonster (or similar large-mouth PET carboy) lid and fitting it with gas and liquid ball-lock posts. Then you are installing a floating dip tube (I recommend the one offered by Brew Products called the Clear Beer Draft System https://clearbeerdraughtsystem.com/), to the liquid bulkhead. This essentially turns the fermenter into a modified bright tank with a low pressure rating.
This build essentially turns the fermenter into a modified bright tank with a low pressure rating.
With this lid you are able to perform the following tasks that had eluded me before: Connect your fermenter to your gas supply during cold crashing, prevent oxygen contact during dry hopping, dry hop with positive pressure, use fermentation gas to fully purge serving kegs, and transfer from your fermenter to your serving kegs without worrying about your beer oxidizing.
When all of these minor tweaks are made to your beer, it will help you to maintain that hops-straight-out-of-the-bag character in hoppy beers, bold and complex profiles in malt-forward styles, and subtle nuances in your light ales and lagers.
The only real caveat with using this system is the possibility of having your regulator set too high. Just be sure to check before use each time. Most PET carboys are rated to 15 psi, but I don’t go above 5 psi.
Tools and Materials
FerMonster carboy with solid lid
FerMonster carboy replacement lid o-ring
Ball-lock post bulkhead — gas-in
Ball-lock post bulkhead — bev-out
¼-in. barb x ¼-in. female threaded stainless barb
5⁄8-in. O.D. x 7⁄16-in. I.D. x 3⁄32-in. o-ring
Floating dip tube
½-in. (13-mm) spade tipped drill bit (3-in./7.5-cm or longer)
(2) Grooved joint pliers
FerMonster lid opener
Steps
1. Measure and mark post holes
Have the top of the lid upright. Proper placement of the liquid and gas post is a crucial part of this build for it to function properly. Using a ruler and chalk/pencil find the center of the lid by drawing straight perpendicular lines–The intersection point will be the center. From the center, mark one post hole 13⁄8 in. (35 mm) to the right and another post hole mark 13⁄8 in. (35 mm) to the left of center. These marks should be 2¾ in. (70 mm) apart from each other.
2. Drill the Holes
Using a power drill and a level surface, clamp or hold the lid down and with downward pressure, drill ½-in. (13 mm) holes on the marks you made for each post. (Make sure the drill is level.)
3. Connect the Post to the Lid
With the lid upright, connect both posts by unscrewing the hex nut and placing them through the lid, keeping the o-ring provided on the post on the top side of the lid. Then place one 5⁄8-in. O.D. x 7⁄16-in. I.D. x 3⁄32-in. o-ring on post from the underside of the lid. Once both o-rings are in place, reconnect the hex nuts to each post and tighten down. Do not overtighten the nut.
4. Connect Threaded Barb to Liquid Post
Before connecting the threaded barb, it is important to determine the liquid post (non-notched, the CO2 post will be notched). Once the liquid post is identified, connect the threaded barb to the post and tighten it.
5. Connect Floating Dip Tube to Liquid Post
Prior to attaching, soak the open end that is not attached to the floating apparatus in a cup of ~100 °F (38 °C) sanitizer solution for 20 seconds to make it more flexible. Then attach this end by pushing it entirely over the barb (you may need to twist it on). At this point your lid is complete.
Photos courtesy of Dom Gallo
6. Water Test
DO NOT EXCEED 10 PSI — LID MAY CRACK Prior to use, you should perform a water test with the lid to check for functionality and leaks. Before starting the test, make sure the FerMonster carboy lid o-ring is properly in place or this will cause CO2 leaks. Fill your fermenter half way with water and then tighten down the modified lid using your FerMonster carboy lid opener to tighten it onto the FerMonster (don’t over tighten). Then set your CO2 regulator to 5 psi and connect its gas line to your modified lid’s CO2 post (notched), checking for air leaks. Then connect a liquid ball-lock fitting attached to an appropriately sized open-ended hose that is placed into a sink or pail to check for water leaks. Once it passes these tests, you are ready to use it for your brews.
When a reader purchases a new kettle he decided to forgo adding any ports. He opted to engineer a stainless racking cane that is primed diff
This website uses cookies to improve your experience. You can opt-out if you wish.AcceptRejectRead More
Privacy & Cookies Policy
Privacy Overview
This website uses cookies to improve your experience while you navigate through the website. Out of these, the cookies that are categorized as necessary are stored on your browser as they are essential for the working of basic functionalities of the website. We also use third-party cookies that help us analyze and understand how you use this website. These cookies will be stored in your browser only with your consent. You also have the option to opt-out of these cookies. But opting out of some of these cookies may affect your browsing experience.
Necessary cookies are absolutely essential for the website to function properly. This category only includes cookies that ensures basic functionalities and security features of the website. These cookies do not store any personal information.
Any cookies that may not be particularly necessary for the website to function and is used specifically to collect user personal data via analytics, ads, other embedded contents are termed as non-necessary cookies. It is mandatory to procure user consent prior to running these cookies on your website.