DIY Draft Trunk Lines: When you want to run long draft lines
Like many homebrewers who keg their beers, I started out serving from a chest freezer with a two-tap beer tower bolted to its lid. When the compressor on the freezer died I decided it was time to increase the number of taps so that I could pour more beer styles simultaneously. This led to a choice: I could either go with a collar keezer, keeping the freezer, kegs, and taps in my brewery, or I could build a bar in the finished part of the basement, but I would have to keep the freezer and kegs in the brewery. I decided it was time to build a bar.
With my old kegerator, the beer lines were coiled up inside with 8 in. (20 cm) of line sticking up into the tower. A bit of pipe insulation in the tower was enough to keep the beer cool all the way to the tap. To get my beer from the brewery freezer to my bar I needed at least 10 ft. (3 m) of beer line outside the keezer. With lines this long, the beer warms up as it flows to the tap. The carbon dioxide in the beer comes out of solution and every pour ends up a warm glass of foam.
To prevent this, I needed to build a “long-draw draft system” with a trunk line to keep the beer cool all the way to the tap. A trunk line is a bundle of draft beer lines with two extra lines to run a coolant through, such as a glycol solution. The bundle is wrapped in tape, with a thick layer of foam insulation around everything. The glycol lines form a loop with glycol pumped from a chiller, through the trunk line, around the taps to cool them, and back through the trunk to the chiller. With glycol-cooled trunk lines, the beer in the long-draw system stays as cool as the beer in the keezer. No foamy pours and the first pour of the night comes out as good as the last.
A trunk line is a bundle of draft beer lines with two extra lines to run a coolant through, such as a glycol solution.

Trunk line can be purchased readymade, but I figured that it would be fun to build my own. For the beer lines, I recommend using barrier tubing like BevSeal Ultra® or EVABarrier. This tubing has very low oxygen permeability, doesn’t leach plastic taste into your beer, and is easy to clean. With barrier tubing, you don’t have to dump the first pour of the night and you don’t have to replace your tubing going from a jalapeño-spiced triple IPA to a light lager.
When planning the route for your trunk line, remember that it’s not going to be very flexible so don’t try and push it through any tight 90-degree turns. You also need to make sure that the length of your beer line is balanced between the pressure in the keg and the distance to the tap and gain in height. There are lots of excellent beer line length calculators that can help with this. Once you’ve figured this out, you can cut your lines to length and start making the trunk line.
Once everything was assembled, I hooked the glycol lines up to the chiller that I use for my fermenter and the beer lines to my kegs and to my four-tap beer tower and my beer engine. I leave the glycol pump running 24 hours a day 7 days a week and without too much extra strain on my chiller, I get a crisp, cool pour from my bar every time.
Tools and Materials
- Chest freezer
- External temperature controller
- Wood to create a “keezer collar”
- PEX or copper tubing (glycol lines)
- Glycol system or other cooling system with pump
- Moisture barrier tape
- Thermal conductivity foil tape
- Foam insulation tubing
- Vinyl barrier tape
- Necessary draft components (such as a beer tower)
Step-by-Step

1. The Keezer Setup
My kegs are kept cool inside an 8.7 cu. ft. (0.25 cu. m) chest freezer with a Johnson Controls A419 thermostat to keep the beer at 38 °F (3 °C). To get the trunk lines out of the freezer, I built a collar from 2×6 boards of wood, then insulated it with foam board just like a standard homebrew collared keezer. Instead of taps drilled into the front of the collar, I used a 3.5-in. (9 cm) hole saw to cut a hole in the back of the collar. A length of 3-in. (7.6 cm) PVC pipe runs through this hole for the trunk line.
2. Bundle the Lines
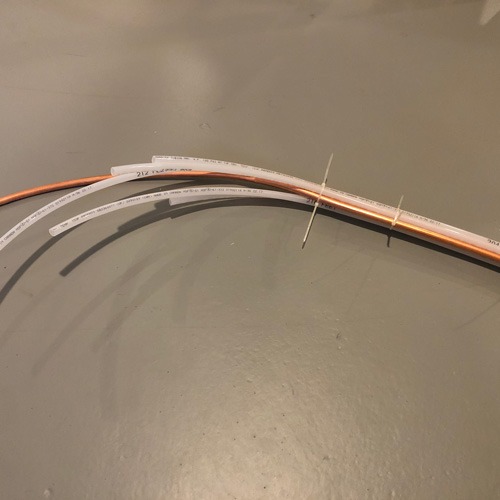
For the glycol lines, you can use either PEX or copper tubing. Make a bundle of lines with two pieces of copper or PEX, and beer lines depending on how many taps you have. The beer line length should be based on the length needed to balance your system. Coil up any excess line inside your freezer. Using cable ties to temporarily hold the lines together, wrangle the tubes so that the glycol lines are in the center and the beer lines are around the edge in contact with the glycol.

3. Interior Tape
Once you have the line assembled with cable ties, start wrapping it with moisture barrier tape followed by a thermal conductivity layer. I recommend Micromatic’s moisture barrier tape. It’s tough and it sticks very strongly to itself to make a tight seal. Line the tape up on a slight diagonal so when you wrap it the tape overlaps about ½ in. (1.3 cm) with itself. Smooth it out as you go to get a good seal (see first photo). Most important is sealing the insulation so it is as airtight as possible. Any warm air in contact with the cold lines will sweat. In a basement, or any humid area, cold draft lines will produce lots of sweat. That water will then pool in the low spot inside the insulation and make your chiller work twice as hard.
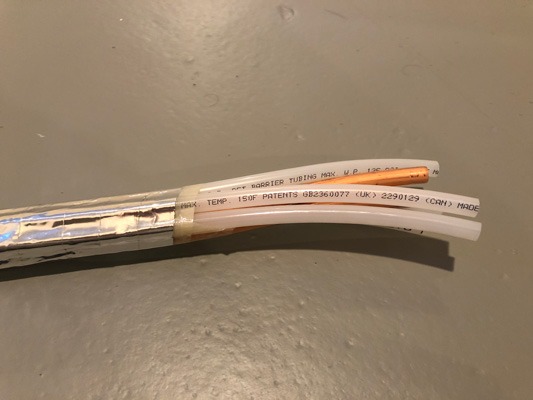
For the thermal conductivity layer, there’s not much difference between the Micromatic foil tape and the standard foil tape that you get at home improvement stores. You could save a few bucks in shipping by getting this at a local store. But if you’re already ordering from Micromatic you might as well get their foil tape as well. Again, overlap the tape by ½ in. (1.3 cm) and smooth out the air bubbles to make a nice, tight seal (see second photo).

4. Foam Insulation
For the foam insulation, just get foam insulation from a local big box store or online. No need to splash out for anything fancy here. Get insulation that’s at least an inch (2.5 cm) thick to keep the line cool. Slip the foam around the taped-up bundles. Next wrap the foam in Micromatic’s 2-in. (5-cm) vinyl barrier tape. This is like wide electrical-insulation tape and gives you a nice smooth finish.

5. Hook Up The Taps
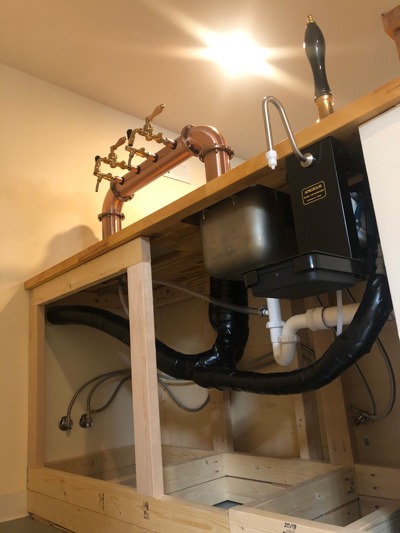
There are loads of options for serving with beer towers from 2 to 20 or more taps. You could also make your own with taps and shanks. I recommend getting a tower with glycol connectors so that you can hook it to the glycol lines. This will keep the taps cool as well, reducing foam. If you DIY the taps, wrap copper tubing around the shanks to keep them cool and use this to make the glycol a loop. I highly recommend using push-to-connect fittings like John Guest or Duotight. If you have stainless steel lines in your tower, make sure you get the “super-seal” connectors that screw together to make a tight connection. Try to avoid barbs and clamps if possible, but if you do go that route, use Oetiker clamps as worm clamps are more prone to leak.

6. Hook Up the Glycol
You need to have some form of glycol chiller that is colder than the kegerator. There are many DIY glycol chillers if you don’t want to spring for a professionally made one. My 1⁄5 HP Ss Brewtech glycol chiller (and my 20-lb. CO2 tank) sits next to the keezer. The glycol lines run to the keezer via 5-ft. (1.5-m) “jumper lines.” The incoming side connects to a Penguin Chillers extra-large glycol pump, which pushes the glycol around the system. I set the glycol temperature to 28 °F (-2 °C), which keeps the beer lines and the taps nice and cool, and allows me to chill two fermenters as well. The glycol blend is 33% glycol and 66% water to prevent freezing in the cooper cold coils, which are down around 0 °F (-18 °C). Getting the quick disconnect kits for the chiller is advised.