The Beer Tower
Several years ago, my family and I decided to remodel our basement. As we looked at the space, we saw the potential to put in a bar to highlight my homebrews.
Thus, was born our terrific basement space: bar, shuffleboard, big TV, game area and a sewing room for my wife Jenn. The kids love it and have enjoyed having a place where they can invite friends over. Since the remodel we started hosting an annual Oktoberfest, which is now eagerly anticipated by our friends.
A little over a year ago, one of my partners at work and I started brewing together. He had brewed on a basic level years ago and was ready to get back into the hobby. We had a great time and decided to do a “SpringFest” as we didn’t want to wait until the fall to highlight our beers for Oktoberfest. It was a great success.
For both events we had two taps in the bar, and put two kegs in a garbage can on ice with picnic taps outside on the deck. It worked fine, but the more I thought about it, the more I wanted a way to serve the homebrew that reflected the time, effort and quality of the beer I served. I looked everywhere for something nice and there just wasn’t anything out there that I liked. I considered getting or making a jockey box, but it still looked like a plastic cooler, and I felt like they were too expensive.

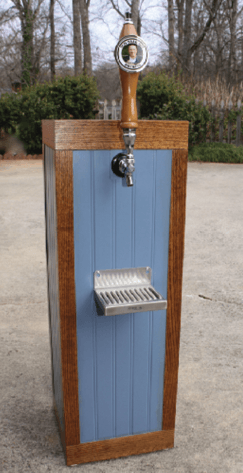
Using my skills from my other hobby, woodworking, I came up with the “beer tower.” I have gotten so many compliments on the design from my guests that I decided to share the design with the rest of the homebrew community. The cost for basic materials to build one tower can be had for under $50 (you can customize however you like, which will increase the cost).
When I made my first tower I actually wanted to make two at the same time, so I used full 4-ft. x 8-ft. (1.2 x 2.4-m) sheets of plywood (see the materials list to the left). Depending on how you want your tower to look, it can be very basic and it will function just as well.
I wanted mine to look like miniature versions of my home bar that I designed and built, so I added 1⁄4-inch (0.6 cm) oak to the corners and bead board in between. I made the sides of the top thicker, which allowed me to use a 12-in. x 12-in. (30.5 x 30.5 cm) matte of slate tiles covered by an epoxy resin, just like my bar top.
The overall height of the tower allowed for both a comfortable height for the tap, room inside for the keg, connectors and tubing plus dry ice and efficient use of the standard sheet goods.
How to Build a Beer Tower
Materials & Tools
• 1⁄2 sheet of 1⁄2-inch- (1.2-cm-) thick plywood
• 1⁄2 sheet of 1⁄2-inch- (1.2-cm-) thick styrofoam insulation
• Stainless wall-mount drip tray
• Silicone caulk
• Wood glue
• Waterproof paint (such as Dry Lock)
• Paint
• Table saw
• Power drill with bits
Cutting List, Plywood
Front and back: 341⁄2-in. x 12-in. (87.6 cm x 30.5 cm)
Sides (2): 341⁄2-in. x 111⁄2-in. (87.6 cm x 20 cm)
Bottom (2): 111⁄2-in. x 11 1/2-in. (20 cm x 20 cm)
Top: 12-in. x 12-in. (30.5 cm x 30.5 cm)
Cutting List, Styrofoam
Front and back: 32 ½-in. x 11-in. (82.5 cm x 28 cm)
Sides (2): 32 ½-in. x 10-in. (82.5 cm x 25 cm)
Bottom (1): 11-in. x 11-in. (28 cm x 28 cm)
Top (1): 11-in. x 11-in. (28 cm x 28 cm)
Step by Step
1. Cut the Joints and Pieces
Start by cutting the pieces in both cutting lists. On the inside long edges of the front and back pieces, cut rabbets 1⁄2-inch (1.25 cm) wide and 1⁄4-inch (0.6 cm) deep. On the inside bottom edge of all of the sides, cut a rabbet joint (a recessed groove) 1-inch wide and ¼-inch (0.6 cm) deep to accept the two bottom pieces. (Some materials listed as 1⁄2-inch (1.25 cm) are a bit more or less than that. Make your rabbets as wide as the material and for the bottom, twice the material thickness.) Dry fit the pieces together, including the insulation and make any adjustments to your cuts at this point. To help keep water from getting to the interior wood surface, apply a coat of a waterproofing paint to the interior surfaces. Painting now before construction is easier. Make sure to not paint 1⁄4-inch (0.6 cm) on the long edges of the sides and the rabbeted areas as these are areas that will be glued later. The bottom consists of two identical pieces, which need to be glued together. Paint one side of this as well, leaving 1⁄4-inch (0.6 cm) on the edges.

2. Construction
Lay the back outside surface down on a flat surface. Apply glue to the rabbet joints. Apply the glue on three sides of the bottom and put it in place with the unglued side facing up. Next, put the two sides in place and place a clamp from side to side on the bottom. The combination of this plus the rabbets will help keep the sides square and vertical without needing to hold them. You can use wood glue to attach the insulation pieces. Start with the bottom piece followed by the back, as it will go from side to side. Next, add the sides. Caulk all of the insulation joints between the sides and the back and the three joints on the bottom. To finish, put the remaining piece of insulation in place and put glue on the side edges and the remaining bottom edge. Put the front in place and stand the tower vertically. Apply clamps from front to back and side to side on the bottom and let dry. Make sure that the insulation is pushed up against the inner walls. Finish the remaining caulking of the front insulation joints.
3. Drill the Holes
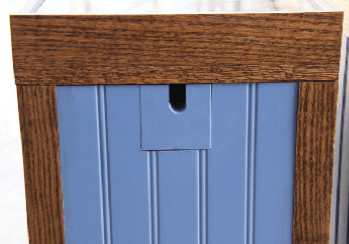
For the tap shank, drill a l-inch (2.5 cm) hole about 2 inches (5 cm) from the top on the front side of the tower. Make sure to support the insulation with pressure on a scrap piece of wood to prevent tear out. For the gas line, cut a 3⁄4-inch (1.9 cm) hole the same distance from the top. If you want, you could thread gas line through this and then connect it to a ball lock disconnect and leave it there. I, instead, cut down from the top of the box to the hole for gas line so I could use my existing gas line/regulator set up. If you do plan to leave your gas line in permanently, make sure the gas line is not snug in the hole. You want some gap, because if you use dry ice to cool the beer (read more on the next page), there will need to be some way for the CO2 to vent.

4. Finish the Exterior
At this point the design of the tower is up to your imagination. The top can be as simple or elaborate as you wish. One l2-inch x l2-inch piece of plywood with the 11-inch x 11-inch piece of insulation centered on the inside is all you need. As you can see, I chose to tile mine. I dadoed (a slot or trench cut) my top into 3-inch (7.6 cm) pieces of 1⁄4-inch (0.6 cm) oak as I covered my “box” with 1⁄4-inch (0.6 cm) oak corner edging and bead board. It gave me an area 12 inches square (30.5 cm square) that was perfect for me to put in my slate tiles and epoxy resin covering. The sides stand up 1⁄4-inch (0.6 cm) above this surface, which can contain a spill.
There are exposed edges of plywood on the corners, which can be covered by pre-made corner edging. You can paint it, stain it, cover it with stickers — whatever. I added a 6-inch stainless wall mount drip tray about a foot below the tap. You can add any drip tray you choose.

5. Keeping it Cool
The first time I used my tower there was very little melt and the beer stayed very cold. I was still worried about leaking water, however. Then Jenn said, “What about using dry ice?” Dry ice could keep the interior of the tower cold for prolonged periods, minimize the risk of wood being exposed to water. From my own experiments, I found that with 3 lbs. (1.3 kg) of dry ice (wrapped in newspaper to protect from freezing the keg) I could keep the temperature stable for hours on end, both inside and outside the keg, with no water or mess. A note about dry ice safety: Dry ice is much colder than regular ice (-109 °F/-79 °C) and can cause severe frostbite within seconds of direct contact. Never handle dry ice with your bare hands, put it in your mouth or put it in beverages to cool them. Dry ice also does not melt, instead it sublimates from a solid to CO2 gas, which is heavier than air. CO2 gas can accumulate and can cause asphyxiation in confined, unventilated and low-lying spaces. Only use dry ice in a well-ventilated area. If there is any dry ice remaining, place it in a well-ventilated area or outside, away from children, to sublimate — do not dispose of it in the garbage or in a sink.

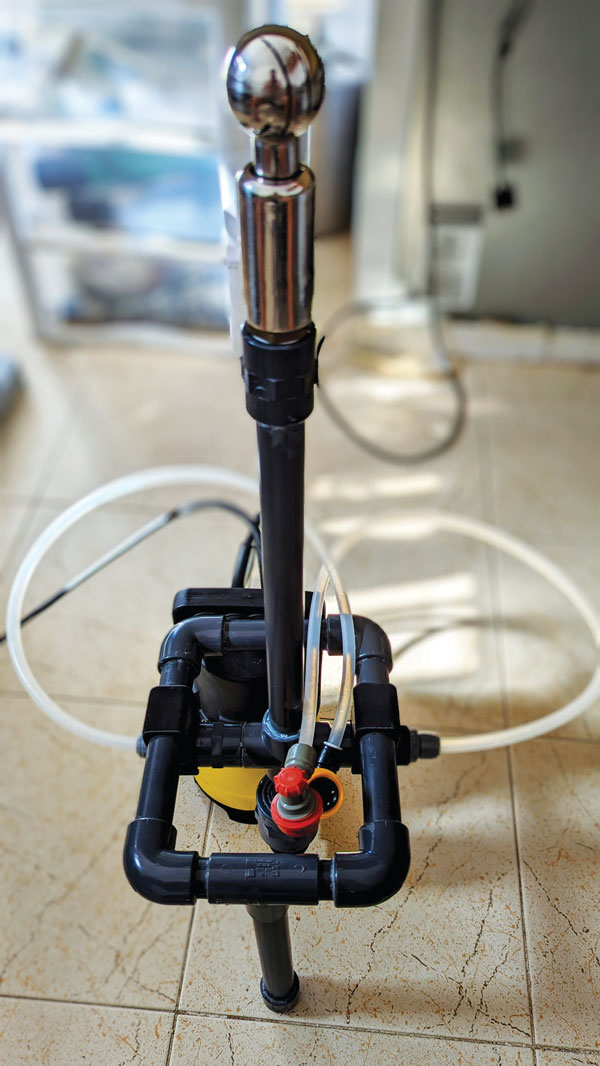
6. Hook It All Up
I used a 3 1⁄8-inch (9.8 cm) shank for the tap. When attaching the shank lock nut to the shank, I use a piece of 1⁄4-inch (0.6 cm) scrap, about 2-inch x 4-inch (5 cm x 10 cm) up against the insulation. This way the lock nut did not cut into the insulation and gave a solid foundation to support the tap. I used 5 feet (1.5 m) of beer line to prevent foaming, and there is enough space along the sides of the keg to let this line loop down and then back up, which helps keep the beer cold all the way to the tap. Put in your keg and add your CO2 lines through the opening in the back, pop on the top and you are set to go. You can make it a true stand-alone unit if you use a CO2 cartridge and mini regulator.