Build a Better Peltier-Cooled Conical
We all know the importance of keeping our fermentation temperature in the ideal range for the specific yeast being used and avoiding fluctuating temperatures. As homebrewers, there are a number of ways to achieve this, with the best option for each individual depending on their own preferences, price range, and space. For me, I wanted something small, neat, and quiet to help keep my fermentation temperature dialed in. These requirements eventually led me to build, and refine, a Peltier cooling system. Though, that wasn’t my first choice.
I started my attempts at temperature control with a water jacket, a pump, and ice bath. It worked OK, but it was messy and required a water reservoir and constant ice replacement. After that, I looked at glycol systems, but they would be overkill for my needs. Fridges were another possibility, but they would need to be large enough to fit the conical, which wasn’t a great option for my space.
I read online about Peltier cooling and decided to give it a shot. A Peltier chip is a thermoelectric cooler (TEC) that transfers heat from one side of the chip to the other. By mounting a Peltier chip against an aluminum block machined to the conical’s curve, the device pulls heat from the fermenter and a fan dissipates the heat externally. There are several Peltier builds on the internet, but none of them exactly suited my needs, so I decided to build my own solution from scratch. There are two links at the end of this article for other builds, both quite similar to each other. I suggest you read them as well before embarking on this project as there are some good ideas in each, some of which I borrowed or based my own build on. Before we get to my own design, let’s discuss Peltier-chilling systems in a little more detail first.
Who Needs a Peltier-Cooled Conical?
This project will ideally suit someone who has a conical fermenter and needs to keep their wort at stable fermentation temperatures. It is best suited for fermenting ales, as the cooling needed for ale fermentation is minimal (usually within about 10 °F/5 °C of room temperature). It will also cool to lager temperatures, but that requires a bit more power, so the fans will be louder. This equipment will handle crash cooling, but the power draw is again larger and the fans will be noisier. It will suit any conical from 6–15 gallons (23–57 L). If you require both heating and cooling, that too is possible, but I’ll let you work out the wiring for the heating as I don’t have that need where I live.

I’ve tested many things and found better ways to do much of it, so if you already have a Peltier-cooled conical, keep reading as you may find these tips useful to further enhance your system.
The Build
Before you start this DIY, know we are working with electricity, which can be dangerous if you are not careful. If you are not comfortable with your abilities, consult an electrician.
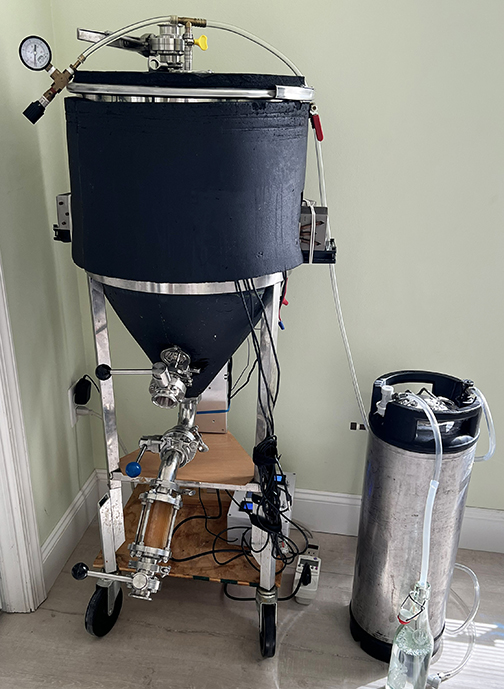
My fermenter is a 12.5-gallon (47-L) stainless steel conical that I bought on Ebay, now fitted with four TEC1 12710 Peltier chips that easily satisfy my fermentation needs.
I have brewed 10-gallon (38-L) batches, but my normal batch size is 6 gallons (23 L) (of which, 5 gallons/19 L go into a Corny keg and the rest is bottle-conditioned.
My conical is slightly pressure-capable and I route the blowoff CO2 through a Corny keg into a bottle of sanitizer. This way I can do an oxygen-free transfer into a pre-purged keg. I also have a port in the lid so I can dry hop without introducing oxygen.
The Peltier systems I originally looked at use two aluminum blocks that require the conical to be fairly full to operate. My preferred batch size only comes to about 3 inches (7.5 cm) above the top of the cone, so my Peltiers had to be mounted very low. Also, the aluminum blocks would have to be purchased or machined by very expensive CNC machines. A further complication was that my conical is not a brand name that the commercially available blocks would be guaranteed to fit.
My solution was to engineer my own much smaller and easier-to-make aluminum blocks, which is the first major deviation from the traditional setup. Cutting a precise curve in aluminum to fit a conical is difficult and expensive, so my solution had to be easy and cheap.
For this, I bought a small 1⁄16-inch thick sheet of aluminum and cut a 1.5-inch (3.8-cm) strip. Then you can easily bend the strip around something slightly smaller than the conical (I used a 5-gallon/19-L kettle). Put the strip against the side of the conical and find a length that fits best and then cut a 1.5-inch (3.8-cm) length (resulting in a square piece of aluminum exactly the size as the Peltier chips). The curved side will go against the surface of the conical, exactly matching the curvature and the flat side will go against the Peltier chip. As I said, cutting curves is very difficult, but milling a flat surface is pretty easy. Leave one side of the Peltier-sized strip with a curve (the concave side), and mill the other side flat. There are many ways to cut a flat surface such as grinding, sanding, filing, etc. I used a pillar drill with a spiral end milling cutter and a cross-slide vice to mill the flat surface required. If you are not comfortable with home milling, any engineering shop should be able to do this for you. Use fine-grit sandpaper to lap the curved side to the conical, and use a sheet of glass or other perfectly flat surface with fine-grit sandpaper on it to sand the flat side to get a smooth finish. Make four of these.
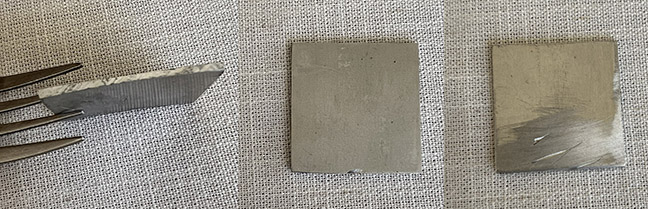
Use two adjustable hose clamps, one top and bottom of the aluminum plates, short uprights either side of the plates will enable connection to the heatsinks. These have a slight bend in them to allow for the mounting screw heads. The screws face outwards to allow for connection to the heatsinks (which I scavenged from old computers).
The plates are then glued to the conical using a thin layer of thermal glue. I originally used thermal paste but condensation on the sides of the conical eventually washed away the paste. You may want to start with thermal paste and change to glue when you are confident with your build.
You will need to insulate your conical. I used K-Flex rubber sheet insulation, which works well.
The top half is fairly straightforward, just cut to length of the cylinder and cut out for the chips, heatsinks, and fans. Cutting to insulate the cone is more difficult. Google “How to make a pattern for a cone shape” and you will find several informative videos on how to do this. I have included a link at the end under “Reference Materials.”
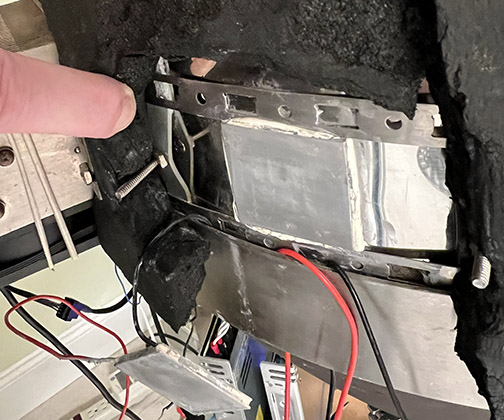
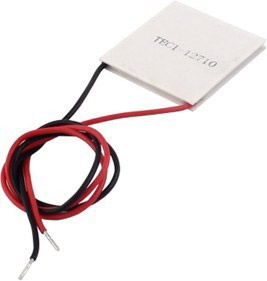
You will need to apply a very thin layer of thermal paste to both sides of the Peltier chip, I used an old credit card to evenly spread the paste, which is then placed on the aluminum plate with the text / model number (cold side) facing the conical. Black wire will be on the right. Heat sink is then secured to the conical fitting snugly against the TEC1 12710 Peltier chips.
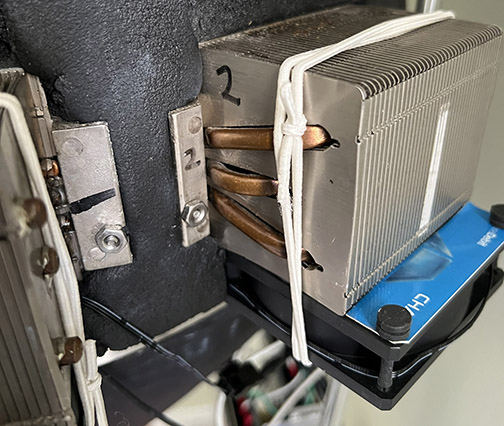
I had to drill small holes in the heatsink to allow the mounting screws to pass through, and then fastened with a nut.
With the heatsinks in place, now is the time to mount the fans. I used elastic cord but there are several ways to accomplish this. I found mounting the fans on the bottom of the heatsinks blowing upwards through the vanes was the most effective method. Your mileage may vary depending on heatsink design and orientation.
I purchased a 5-pack of Arctic P8 fans, which are extremely quiet. This gave me one for each heatsink and one for the power supplies, which I put back-to-back with the fan sandwiched in between. The airflow of the fan is adequate to keep the power supplies cool enough where their internal fans do not need to come on. I reversed the direction of one of the internal fans so when needed, all the fans draw in the same direction.
I then bought a couple of cheap drop-down voltage controllers to reduce the 12V from the power supplies so I could control the fan speed to that required to keep the heatsinks cool without the noise of full speed fans.
Temperature Control
You will need a 110/120V temperature controller. The probe will be attached to the outside of the fermenter or if you have a thermowell you can insert the probe into that. I started with a thermowell but found the temperature readings on a probe on the outside of the fermenter (under the insulation) to be so close that I now only use that.
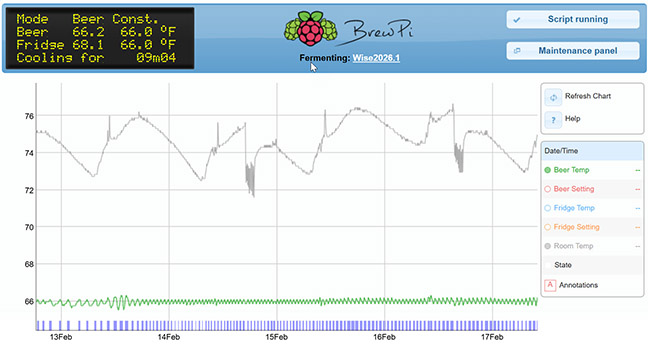
You can also use other temperature controlling solutions such as BrewPi/Brewblox, which I now use with a Raspberry Pi-based controller with two Arduinos that in turn control the power supplies. This turned out to be a perfect solution for me — I have one channel controlling each pair of chips, with one channel set half a degree higher than the other so it cuts in if further cooling is needed. Temperature stability is stellar, usually plus or minus less than 0.2 °F (0.1 °C) of the set point. I think it is best to start with a simple controller.
Power Supply
This is where you have to make some decisions. If you only need a 10 °F (6 °C) drop from the ambient room temperature to your fermentation temperature, then a 100W power supply should be sufficient. If you’re brewing lagers or are in a room that gets hot in the summer and need a 20 °F (11 °C) drop, it will require 300–350W. Cold crashing will require even more. The important thing here is to estimate the difference between your maximum room temperature and the minimum fermentation temperature needed.
If you have an old computer power supply laying around, that will be a good start and then you can upgrade from there.
I use two Mean Well LRS-350-12 power supplies. These are well-suited
to the task, although slightly noisy when the internal cooling fans kick in. This gives me all the power I need for multiple configurations. The voltage can be adjusted between about 10–13.5 volts, giving more flexibility in powering the system.
Voltage Control
This is where the fun begins — you will need to experiment with various configurations to suit your fermentation needs. This build is extremely flexible: You can use a high-power configuration to quickly cool 80 °F (27 °C) wort to pitching temperature, then rewire to low power for the rest of the fermentation, an almost silent configuration. Here are some suggestions:
Don’t run 12V Peltier chips at 12V
They are very inefficient at or near max voltage. If you reduce the voltage, efficiency improves. The trick is to supply slightly more power to the chips than you need to maintain temperature so the controller can cut in and out to keep the brew at the set temperature and keep running near highest efficiency for your system.
For ales — 10-12 °F (6–7 °C) below ambient room temperature
Run four Peltiers in series. With a 12V power supply, each chip gets 3V and the fans can run at 6v. This is my favorite configuration as the unit is virtually silent and draws the least power.
For lagers and cold crashing — 20–30 °F (11–17 °C) below ambient room temperature
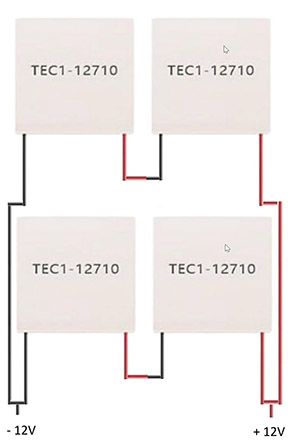
With a single power supply you can have the two chips in series, in parallel with the other two chips in series. 6V per Peltier. The wiring required for that is shown on the following page. If you are building a system with two power supplies then you will use the top configuration with each set of chips having its own power supply. This will allow you to control each set of chips independently.
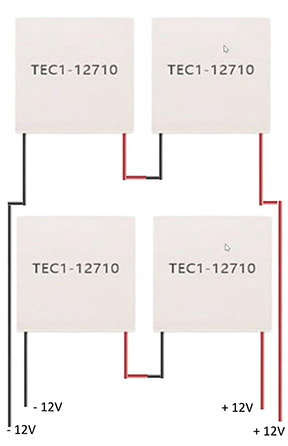
Extreme cold crashing — 30–40 °F (17–22 °C) below ambient room temperature
All four Peltiers will run in parallel, 12V to each.
I would suggest two power supplies for this, as you will be drawing about 40 amps total, 20 from each supply. Your wiring and connections will have to handle very high current, you will need more powerful fans than the ones specified, as well as large and efficient heatsinks.

Use fan power adapter cables to connect your fans to the terminal block. This will allow longer lengths of cable and also allow for quick and easy fan connection or swap if needed. The 4-pin cables fit 3- or 4-pin fans, although only two connections are needed. Pin 1 (Gnd) and pin 2 (+12V).
When you have tested everything, run a trial with water in the fermenter to see how it performs. When you are happy with the performance, time to try it out on a brew. Remember, wort will need more cooling power as fermentation produces heat.
Results
I am getting better cooling with two chips in series than one chip at full voltage, using half the power. One chip at 12V draws about 120W, while two chips in series draw about 60W and the cooling is more effective. Another bonus, the much lower current draw means that the heatsinks now barely get warm, requiring much less airflow from the fans. At chip voltage of 12V each, heatsink exceeds 100 °F (38 °C), at the much lower current the heatsinks are in the 70s °F (low- to mid- 20s °C).
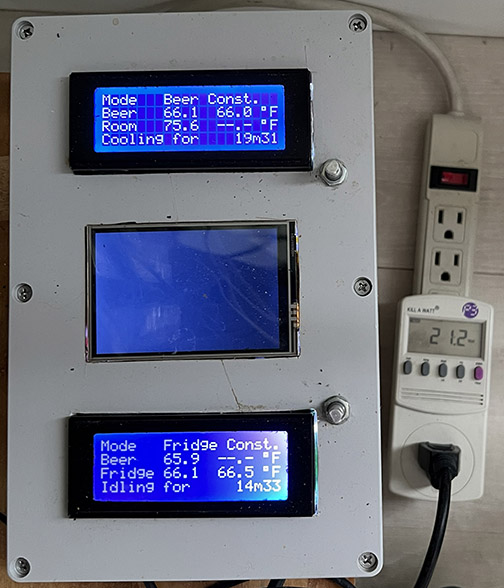
Just for fun I connected all four Peltier chips in series and reduced voltage to 10V. It is currently keeping 6 gallons (19 L) of English ESB (SG 1.061) at a constant 66 °F (19 °C) during the height of fermentation and drawing 21 Watts, at a duty cycle of about 2/3 (cooling for ~30 minutes, idling for ~15 minutes). Room temperature is 75 °F (24 °C), yet the fan noise is just a whisper.
The cost to run is negligible, at about 25 cents per week. Say 25 Watts at average duty cycle (both actively fermenting and just keeping cool) of 50%. 25 x 24 x 7 x 50% = 2.2 kWh at 11 cents per kWh.
If I were to build again, I would probably only use one power supply and temperature controller (still BrewPi) as the Peltier chips have been extremely reliable and I haven’t needed to replace one for years. I would use a much less powerful power supply, possibly a variable supply, so I could keep all four chips in series and vary the power to just over that needed to cool to the desired temperature. That way the chips are operating at their most efficient.
If you want to heat the beer instead of cooling it, it is fairly straightforward to reverse the voltage to the Peltiers.
A Note on Components
Don’t buy cheap Chinese LED power supplies. They almost always overstate the power they can produce by a large margin. Use a well-known and reliable power supply.
Heatsinks are at the heart of the system — use large heatsinks with plenty of vane surface area. Peltier chips produce a lot of heat, especially at higher power settings requiring efficient cooling.
Reference Materials:
Two other Peltier builds, both use the large CNC-engineered aluminum blocks:
Build 1 (from the American Homebrewers Association)
Build 2 (from Cian Clark)
Brewpi documentation
Peltier efficiency reference
Cut pattern for a cone
Parts List:
• Stainless steel conical fermenter
• (4) TEC1 12710 Peltier chips
• Adjustable stainless steel hose clamps
• 1⁄16-inch thick sheet of aluminum
•K-Flex rubber sheet insulation ½- or ¾-inch
• 5-pack Arctic P8 fans (These are suitable for lower-powered builds as they are extremely quiet. If you need lower temperatures, look for more powerful fans.
• 110/120V temperature controller (Many options here; if you are in the U.S. make sure it displays Fahrenheit, many don’t.)
• Mean Well LRS-350-12 power supplies (1 or 2 depending on power requirements)
• Fan power adapter cables
• Terminal block
• Drop-down voltage controllers
• Wires and ring connectors to suit.
More Ways to Cool . . .
Peltier-cooling isn’t your only DIY option to keep fermentation temperatures at desired temps. If you have drooled over a glycol chilling system, wishing you could afford one, drool no longer. Here is a build that is drool-worthy — at an affordable price.