Once my homebrewing efforts moved out of the kitchen at the strong suggestion of my wife, I found myself having a hard time effectively getting 5 or 10 gallons (19 or 38 L) of wort close to fermentation temperature. In addition, after a long brew day I often forgot to set up my oxygenation stone and hated cleaning and sanitizing all the various parts individually.
Photos by Ben Hamlin
I invested in a good, quality plate chiller (Blichmann Therminator™) early on to try to achieve efficient chilling. However, the flow through it was severely hampered by the residual trub in the kettle, despite having a powerful pump attempting to push it through. Adding an inline trub filter seemed to be the answer, however even the best version I came across (Brewers Hardware’s Wort Strainer) still clogged about half-way through the chilling process. Something in my process needed to be fixed since I knew I wasn’t the only one using a plate chiller.
My solution was to start to add a whirlpool step at the end of each boil session, for several reasons. First, it is a great time to add in the adjuncts and flavoring hops and second, and most important, it creates a lovely center pile of trub that doesn’t get sucked down the pickup tube. I had my solution, now I had to figure out a way to put it all together into a single unit, so the end of the brew process didn’t continue to require my non-existent third arm.
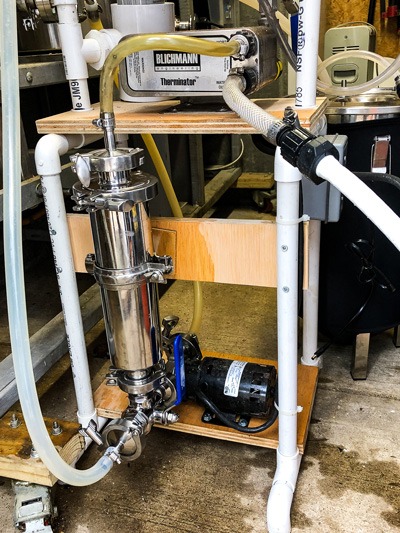
My Worterator consolidates all the finishing steps together on a convenient stand set up; such that wort processing, cleaning and sanitizing is painless
My Worterator consolidates all the finishing steps together on a convenient stand setup; such that wort processing, cleaning, and sanitizing is painless. While I did not list it in my parts list, you need to make sure that your kettle has the proper configuration to allow a laminar flow of wort to create the whirlpool. In other words, you want as little turbulence to the whirlpool’s motion as possible. You can easily find the components to make this happen at many homebrew hardware outfitters if your kettle is not already configured or you can see the “Whirlpool Port Install” in the January-February 2019 issue.
My Worterator unit is driven by its own exclusive pump. This is necessary to ensure that I do not burn myself on hot fittings during the process. Since I favor tri-clover fittings, opening and tightening hot clamps is not my idea of fun. I placed the pump near the base of the stand to prevent having to siphon to get things flowing. The pump performs the whirlpool then with a twist of a sanitary three-way valve at the pump head, I easily divert the flow into the filter-chiller-oxygenator setup. I chose to buy most of the components off the shelf since I prefer tri-clover connections, but it could just as easily be configured using other disconnects or stainless NPT pipe. Below are sources for my hardware.
Materials
Plate chiller (I have the Blichmann Therminator™)
High-temperature pump (I have a Chugger)
Tri-clover wort strainer (Brewers Hardware)
Tri-clover three-way valve (Brewers Hardware)
Tri-clover pump head (Brewers Hardware)
Inline oxygenation kit (Ss Brewtech)
Tri-clover thermometer (Ss Brewtech)
Stainless ball valve (MoreBeer!)
¾-in. PVC piping (local hardware store)
Step-by-Step
1. Building the Frame
I chose to use PVC as it is very easy to work with: Inexpensive, waterproof, lightweight, and can be cut and shaped easily. Most importantly, since I expected to experiment with different configurations, I could modify (or completely trash) my early efforts without too much trouble. I started by building up from the bottom where the pump was to be located. A simple PVC layout with a plywood platform screwed to it served as the pump base and provided some additional rigidity to the PVC. I then measured the length of the wort strainer to ensure that it would direct wort to the chiller with as little tubing as possible. I chose to hard wire the pump to an outdoor waterproof switch for pump control and added a long cord so it would not limit the places I could use the unit.
2. The Chiller
Once I determined a proper height, I built another (slightly smaller) plywood platform to attach the plate chiller unit. The platform is a simple PVC box with the plywood screwed directly to it. The chiller’s components are very tightly arranged, leaving little room for fingers when making connections, therefore I chose quick connect fittings for the water side so I could easily snap in the water-in and water-out. For the wort output I chose a stainless steel 90° elbow from the chiller’s “wort-out” fitting to the flow control valve. This sets the flow control at a convenient height that is easily operated by my Neanderthal hands.
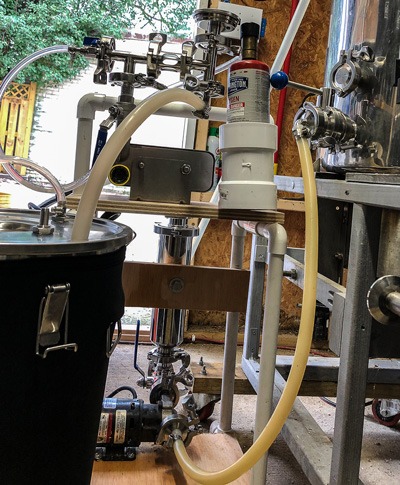
3. Inline Oxygenator
The Ss Brewtech inline oxygenation kit comes with all components needed right out of the box, with the exception of a thermometer. Attaching a tri-clover connector to the control flow valve positioned the unit in a perfect location where it is easily viewable during operation. Adding a PVC “holder” for the O2 tank keeps it close by for quick adjustments to the oxygen levels (as seen through the site glass). Finally, a thermometer added to the top tri-clover fitting allows me to control the flow of wort through the chiller to within a narrow temperature window.
4. The Layout
The output from the inline oxygenation is set at a height that easily flows to the fermenter using gravity. I am also able to “push” wort actively up to my larger 15-gallon (77-L) fermenter if necessary, minimizing the need to move or lift heavy fermenters full of wort around my shop.
5. Making It Mobile
A PVC handle across the top connecting the two sides of the platform provides a spot for two oxygen tanks, but also a way to haul the entire unit around when and where it is needed. The whole unit (empty) weighs less than 25 pounds (11 kg). In the future I think I might add wheels to the base to make it easier to roll around.
6. Using the Worterator
At the end of the boil I open the butterfly valve on the boil kettle and allow wort to flow down to the pump. Making sure the three-way valve is directing the wort in the proper direction, I then turn on the pump to start the whirlpool cycle. After the whirlpool session is complete, I turn the three-way valve to redirect the wort to the chiller. Having all the controls (water flow, wort flow, oxygen flow, etc.) all within a few inches of each other makes the entire process very easy.
Cleaning: At the end of the brewing process, I simply attach the water supply to the wort output end of the chiller and backflush everything very thoroughly. I can continue to clean further with the brewery cleaning in place by filling the boil kettle with PBW and flushing it all through. I do suggest taking the unit apart occasionally as the three-way valve and filter tend to still have cling-ons.
Sanitizing: The unit can be sanitized using the pump to push your agent of choice from a bucket (or kettle) through the entire setup.
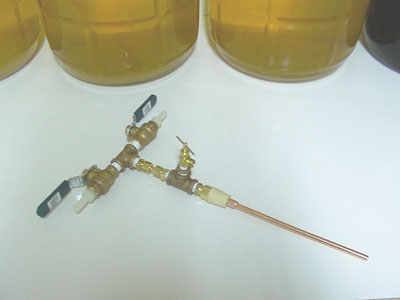
Want to bottle sediment-free beer from your keg? With an hour of your time and $30 worth of parts, you can make your own counter-pressure b
This website uses cookies to improve your experience. You can opt-out if you wish.AcceptRejectRead More
Privacy & Cookies Policy
Privacy Overview
This website uses cookies to improve your experience while you navigate through the website. Out of these, the cookies that are categorized as necessary are stored on your browser as they are essential for the working of basic functionalities of the website. We also use third-party cookies that help us analyze and understand how you use this website. These cookies will be stored in your browser only with your consent. You also have the option to opt-out of these cookies. But opting out of some of these cookies may affect your browsing experience.
Necessary cookies are absolutely essential for the website to function properly. This category only includes cookies that ensures basic functionalities and security features of the website. These cookies do not store any personal information.
Any cookies that may not be particularly necessary for the website to function and is used specifically to collect user personal data via analytics, ads, other embedded contents are termed as non-necessary cookies. It is mandatory to procure user consent prior to running these cookies on your website.