Like everything in homebrewing – the hobby is what you make of it. Want to eke out a few more percentage points of attenuation? How about lagering right in your fermenter at near-freezing temperatures? Fermentation temperature control is where homebrewers often will exact a little more attention, striving for precision from initial pitch to packaging.
Visit any craft brewery and you’re likely to see large, jacketed fermenters that run a glycol solution through their inner and outer skins. These gems can maintain precise temperature control at the touch of a button. Oh the jealousy as a homebrewer! But is it really just a dream to have that kind of control? The simple answer is – absolutely not! With the flood of sophisticated homebrew fermenters on the market, each with their own cooling coils, and heating jackets; precise temperature control of these beauties is only a portion of your paycheck away. (Well, hopefully a portion!).
But now, how to control the cooling? After all, unless you’re an exclusive kveik yeast user, cooling is the most important aspect of maintaining precise temperature throughout fermentation. Sure, you can fill a cooler full of ice bottles and exchange daily until you’re ready to package. Is that really what you want to do after shelling out the dough for your dream fermenter? There are better ways! In this article we will show you how to make your own glycol chiller with the capacity to control many fermenters at once down to near-freezing temperatures for as long as you desire. And the best part: You can do this for a small fraction of the cost of a pre-built unit.
An air-conditioning system functions off a basic principle of physics that when a substance is converted from a liquid to a gas (known as phase change) heat is absorbed.
An air-conditioning system functions off a basic principle of physics that when a substance is converted from a liquid to a gas (known as phase change) heat is absorbed. A refrigerant is used with specific properties to exploit the phase change and maximize this heat absorption. When deconstructing any mechanical refrigeration system, there are two heat exchangers, a compressor, and an expansion valve. The evaporator is the heat exchanger on the “cold” end of the cycle that converts from liquid to gas and absorbs heat from the area around it. Instead of blowing air over the evaporator, as home air conditioners typically do, the evaporator can be placed into a bath of glycol where it absorbs heat energy from the glycol bath and lowers its temperature. The second heat exchanger, the condensing coil, is used to move heat energy from the hot, liquid refrigerant exiting the compressor to the external environment before the liquid refrigerant is expanded to a gas in the evaporator coil. This is done outside of the glycol bath.
To construct a glycol chiller we will start with a standard “window” A/C unit and modify it to allow the evaporator to be placed in a glycol bath. This bath will serve as a cold liquid source to pump into your chilling coil.
Tools and Materials
5,000 BTU window A/C unit
40–60-qt. (37–57-L) cooler
Inkbird ITC-1000F controller
Aquarium wave pump (~500 gph)
Enclosure: Wood, plywood, plexiglass, fasteners, and paint.
14-gauge minimum wire
(2) 120V duplex outlets, switches, wire nuts
1 can expandable pond foam
3 ft. (0.9 m) of ½-in. (13 mm) pipe insulation
5 gal. (19 L) propylene glycol with rust inhibitor
5 gal. (19 L) distilled water
Optional: Tablet display with power cord, LED lights, etc.
Step-by-Step
1. Modify the A/C unit
The wall A/C unit you’ve selected will need some modification before it can be used to cool glycol. First, we need to deconstruct the A/C unit. Remove the outer shell, unbolt the thermostat and controls and leave loose. Now, remove the fan assembly and venting that originally blew air through the evaporator. Place your intended cooler next to the A/C unit and plan where it will be placed (1a). This will determine the placement of the evaporator that will need to be extended away from the rest of the A/C equipment.
1A
Now comes the most critical part. Slowly, and carefully, start to bend the copper tubing that connects the evaporator to the expansion valve and compressor (1b). Make multiple small adjustments and take your time. Too much strain on the tubing can break it, and the A/C unit will become a heavy paperweight. Applying localized heat with a heat gun can help. Move the evaporator to the point you are happy with its position.
1B
2. Modify the Cooler
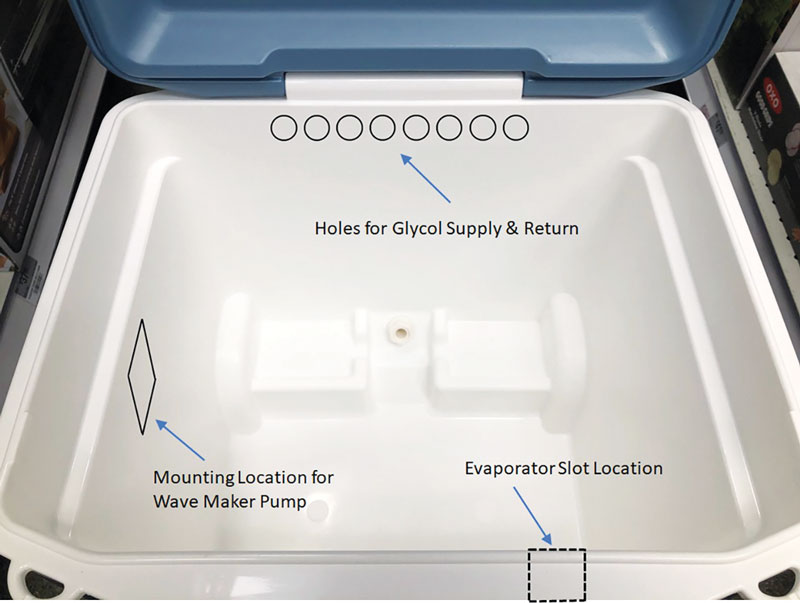
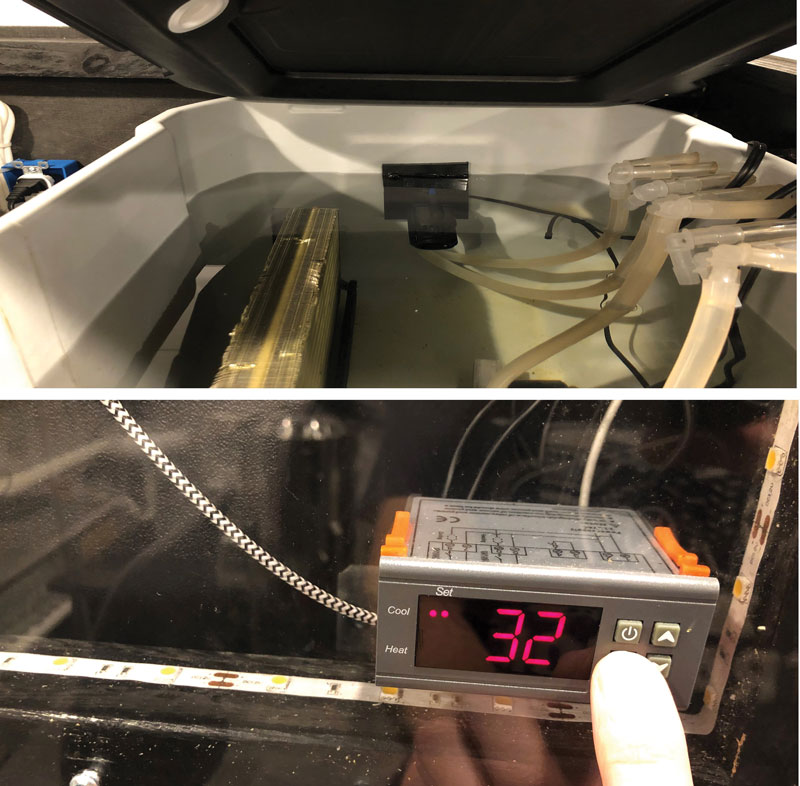
The cooler needs to be modified for the equipment that will be placed inside. This includes chiller lines to the pumps, wiring for the pumps and controller, an aquatic fan for movement of the glycol, and the evaporator itself. Place holes high in the cooler for the pump lines and wiring. Decide how you want to mount the wave maker pump, if it uses a suction cup, note that the cooler materials will not be adequate to mount it. In my case, I screwed a smooth piece of HDPE plastic to the cooler.
The slot needed to insert the evaporator and its tubing is the largest modification. Using a razor blade, cut the slot to the needed width and depth. Remove the plastic shell and foam. Save the plastic shell as we’ll use it to seal the area in step 5.
3. Build an enclosure
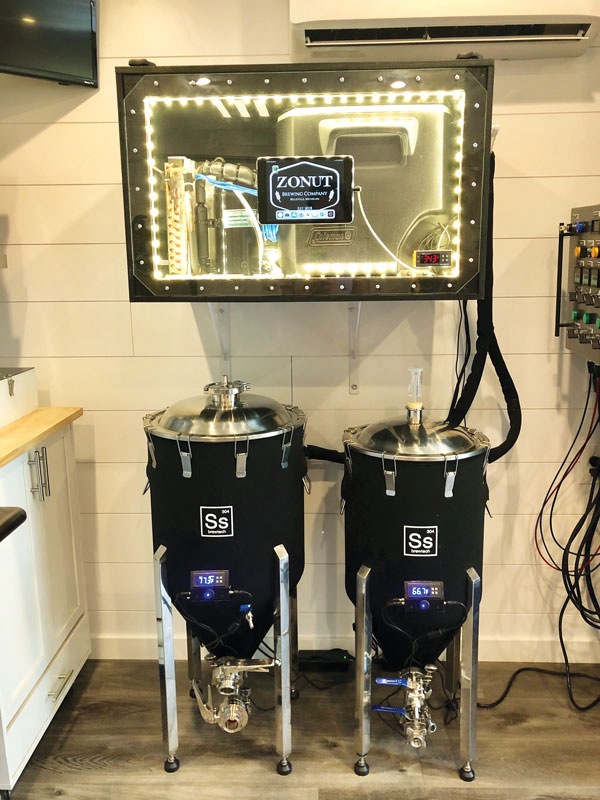
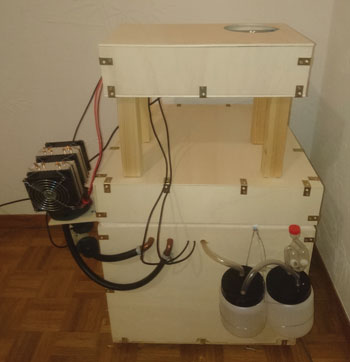
The components will need to have a platform to mount everything. This can be as simple as a single board that leaves the equipment in the open, to an enclosed box for a more professional look. This is your opportunity to make the piece look the way you want. Make sure you plan where all components will be and where external connections will be made. My enclosure was made from scrap 2×2 lumber and plywood. Because I wanted a professional look but still having the components visible, I planned for a plexi-glass front with LED lights to show it off. If you fully enclose the unit, make sure there is sufficient venting to allow air to pass over and away from the condenser.
4. Mount the components
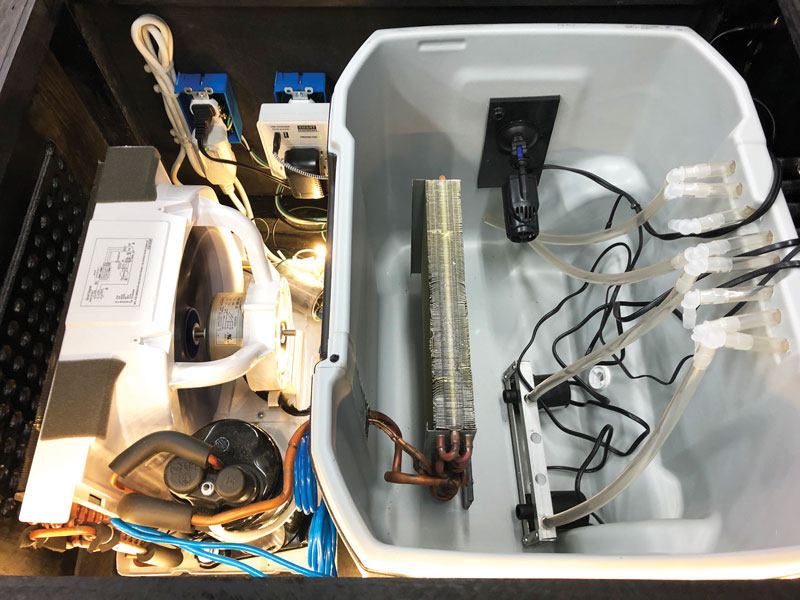
First, place the cooler into your enclosure. Carefully lift the modified A/C unit into position with the evaporator now placed in the cooler. Secure all components including the chiller pumps, wave maker pump, temperature controller, and anything else you’ve planned. The evaporator lines running outside the cooler will build condensation, so wrap them in small pieces of pipe insulation used for household plumbing.
Now we need to seal the cooler slot. Take the piece of cooler shell you cut out before, and place back in its original location, with a small amount removed where the evaporator tubing passes through. Tape the shell piece in place temporarily, drill a small hole in the top, and fill the open cavity with expanding foam. I chose “pond foam” since it’s meant for wet locations. Do not fill the entire cavity. Allow the foam to expand naturally in the space. Too much fill and the foam will bow out the loose shell piece. Once cured, remove the tape, clean the surface, and apply a small bead of silicone around the slit in the cooler shell and the evaporator tubing.
5. Wire it Up
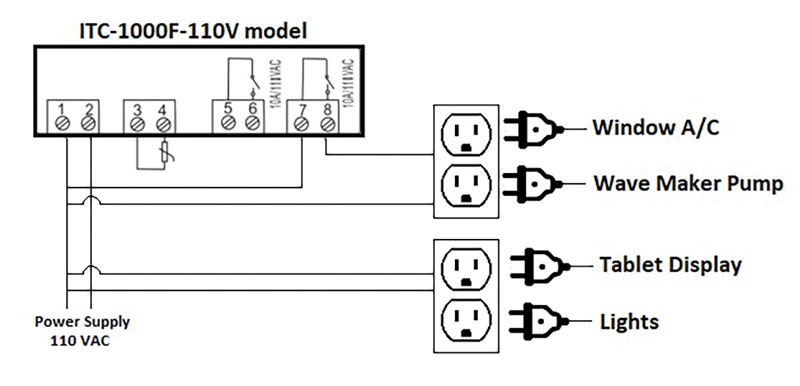
The glycol chiller will use a temperature controller to maintain the glycol bath. The controller will need to turn on the A/C unit at the high-limit temperature and turn if off when the set temperature is reached. Following the controller instructions, connect the power-on cooling circuit to a standard AC-duplex outlet. Plug both the A/C unit and the aquarium fan into it. Anytime the A/C unit is on, the glycol needs to be passing through and around the evaporator to maximize heat transfer. Finally, bypass the thermostat that came with the A/C unit so that when power is applied, it will always operate in maximum cooling mode.
Constant power should also be brought to the controller, as well as any other accessories you want to use. My chiller has LED lights to show it off, and powers an old iPad to run the TILT app to monitor specific gravity in real time.
6. Fill with glycol and test
The glycol needs to be mixed with deionized (distilled) water to allow for a low enough freeze point, but maximum heat transfer. A good rule of thumb is ½ glycol, ½ water. The freezing point of this solution will be well below even the evaporator tubing, so no freezing occurs in the cooler. I recommend using food-grade propylene glycol (DO NOT use ethylene glycol). Although we don’t expect the glycol to ever mix with beer, it’s a good practice to keep toxic fluids out of the brewery. The evaporator will typically have a galvanized steel frame around it, so to prevent long-term corrosion, add the proper amount of food-grade corrosion inhibitor.
Fill the cooler so the evaporator is totally submerged, even after glycol is cycled through your lines and fermenter coils. Turn on the power to the system and set the controller to your desired temperature, anything from 20 to 50 °F (-7 to 10 °C). Check for any leaks and proper operation of the A/C unit. You have just completed a professional piece of brewing equipment that will make your fermentation process shine.
I’d seen that some of the popular fermenter manufacturers make relatively costly drop-in immersion chilling setups for their conical ferment
This website uses cookies to improve your experience. You can opt-out if you wish.AcceptRejectRead More
Privacy & Cookies Policy
Privacy Overview
This website uses cookies to improve your experience while you navigate through the website. Out of these, the cookies that are categorized as necessary are stored on your browser as they are essential for the working of basic functionalities of the website. We also use third-party cookies that help us analyze and understand how you use this website. These cookies will be stored in your browser only with your consent. You also have the option to opt-out of these cookies. But opting out of some of these cookies may affect your browsing experience.
Necessary cookies are absolutely essential for the website to function properly. This category only includes cookies that ensures basic functionalities and security features of the website. These cookies do not store any personal information.
Any cookies that may not be particularly necessary for the website to function and is used specifically to collect user personal data via analytics, ads, other embedded contents are termed as non-necessary cookies. It is mandatory to procure user consent prior to running these cookies on your website.
Continue reading – Enter your email to log in or register
New to Brew Your Own? Create a free account to get our weekly newsletter and two free article webpage visits every month.
Time to upgrade!
You have read all your free content for the month.